


Export/Delete Panic Dump
Overview
"Panic Dump" is the action of outputting (dump) memory information when an error (panic) occurs, and also the name of the output information itself. This function exports and saves the memory information of the Controller Module that is stored in the panic dump data, in a segment size specified by the user. An exported panic dump can be stored on a floppy disk or hard disk, or sent by E-mail.
Panic dump is used to analyze the cause of a firmware abnormality or hardware error.
This function cannot be used when there is no panic dump to be exported in the storage system.
If one user performs the setting operation while another user is downloading a panic dump, a timeout occurs and the setting operation may be stopped due to an error.
Up to two panic dumps can be stored in a single CM.
If panic dumps saved in the storage system are no longer required, click the [Delete] button to delete the panic dumps. Make sure to backup any necessary data before proceeding.
When logged in with Admin or SecurityAdmin role, the [Delete] button is not displayed. Only exporting is executable.
User Privileges
Availability of Executions in the Default Role
| Default role | Availability of executions |
|---|---|
| Monitor | |
| Admin | |
| StorageAdmin | |
| AccountAdmin | |
| SecurityAdmin | |
| Maintainer |
Refer to "User Roles and Policies" for details on the policies and roles.
Settings
Select the panic dump that is to be exported from the list displayed in the screen and specify the file size (segment size), or select the panic dump that is to be deleted from the list displayed in the screen.
| Item | Description | Setting values |
|---|---|---|
Panic Dumps |
Select the checkbox for the panic dump that is to be exported or deleted. Select only one panic dump that is to be exported. Select panic dumps that are to be deleted. Multiple selections can be made for deletion. |
Selected Cleared (Default) |
Dump File Segment Size |
Select the file size (segment size) when saving the exported panic dump from the following:
|
Non-segmentation (Default) 4.27MB 1.44 MB (Floppy Disk) 640 KB (E-Mail) |
Display Contents
The details of the panic dump to be exported are displayed.
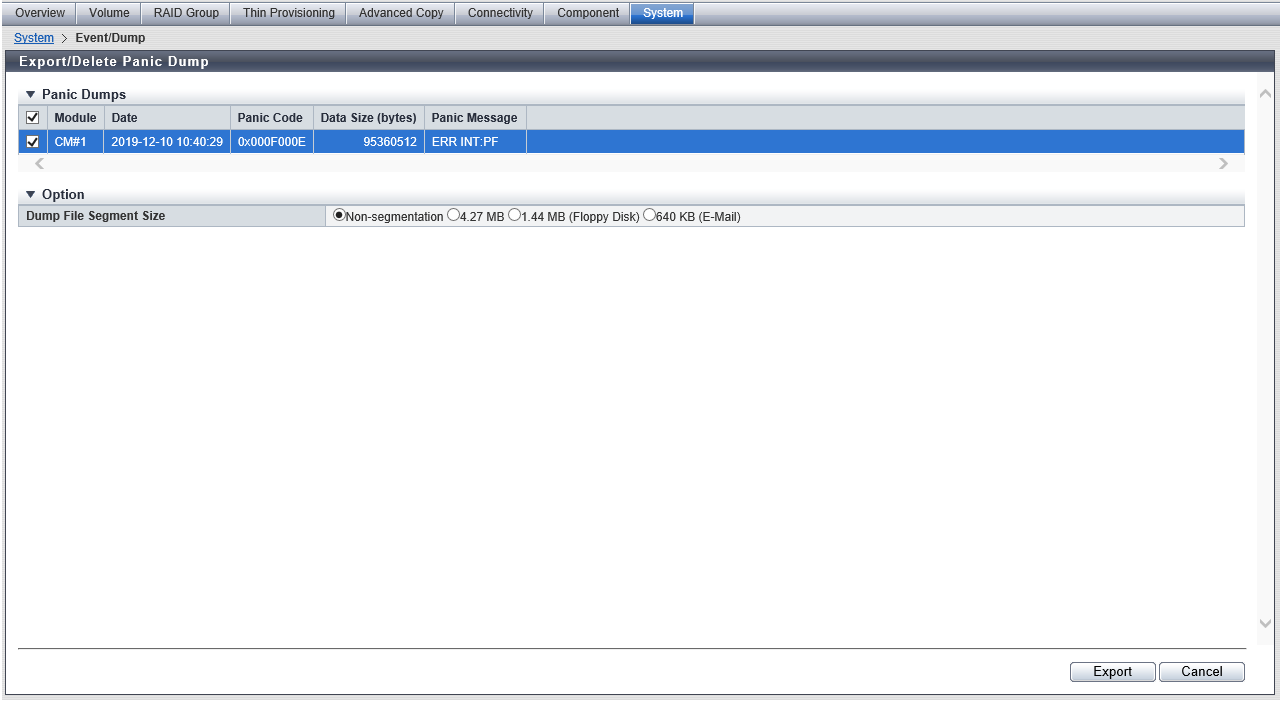
Panic Dumps
| Item | Description |
|---|---|
Module |
The Controller Module name where a panic dump occurred is displayed. For the ETERNUS DX900 S5 or the ETERNUS DX8900 S4 CE#x CM#y For the other models CM#y x: CE number y: CM number |
Date |
The date and time, when the panic dump has occurred, are displayed. |
Panic Code |
The panic code is displayed. |
Data Size (bytes) |
The file size (byte) of the occurred panic dump is displayed. |
Panic Message |
The panic message is displayed. |
Function Button
| Button | Description |
|---|---|
[Delete] |
Deletes logs saved in the storage system. Multiple panic dumps can be deleted in a single operation. The [Delete] button is displayed only when a user account that has a "Maintainer" default role was used to log in. |
Operating Procedures
Export Panic Dump
Export the panic dump.
Click [Export/Delete Panic Dump] in [Action].
Specify the panic dump that is to be exported and the segment file size, and click the [Export] button.
→ A confirmation screen appears.
Click the [OK] button.
→ Exporting of the panic dump starts. The progress screen is displayed.
After the panic dump export is finished, a screen to execute downloading the file is displayed.
Click the [Download] button to save the exported panic dump.
→ A dialog box to download the file appears.
CautionWhen exporting of the panic dump has been completed, save the panic dump immediately.
NoteIf "Non-segmentation" is selected in the "Dump File Segment Size" field, the [Download] button becomes inactive after the panic dump is saved. Proceed to Step 5.
Save the panic dump.
The default file name depends on the model as follows.
For the ETERNUS DX900 S5 or the ETERNUS DX8900 S4: "Panic_serial number for the storage system_YYYY-MM-DD_hh-mm-ss_CExCMy_serial number for panic dump file.zlg"
(YYYY-MM-DD_hh-mm-ss: the date and time when the panic has occurred. x: CE number in which the panic has occurred. y: CM number in which the panic has occurred. When a panic dump file is segmented, the segmented panic dump files are given the same name and numbered serially (01 -).)
For the other models: "Panic_serial number for the storage system_YYYY-MM-DD_hh-mm-ss_CMy_serial number for panic dump file.zlg"
(YYYY-MM-DD_hh-mm-ss: the date and time when the panic has occurred. y: CM number in which the panic has occurred. When a panic dump file is segmented, the segmented panic dump files are given the same name and numbered serially (01 -).)
→ If the panic dump file is segmented, download and save the next segment (save all the segmented files).
CautionWhen saving segmented panic dump files, make sure to save the segment within five minutes. If five minutes passes before saving the next segment, the panic dump export fails. After finishing saving each segment, save the following segment immediately.
Click the [Finish] button.
→ A confirmation screen appears.
Click the [OK] button to return to the [Event/Dump] screen.
Delete Panic Dump
Delete the panic dumps. Panic dumps can be deleted only when a user account that has a "Maintainer" default role was used to log in.
Click [Export/Delete Panic Dump] in [Action].
Select the deletion target panic dumps (multiple selections can be made), and click the [Delete] button.
→ A confirmation screen appears.
Click the [OK] button.
→ Deleting of the panic dump starts.
Click the [Done] button to return to the [Event/Dump] screen.