


Start Disk Diagnosis
Overview
This function starts the disk diagnosis.
The disk diagnosis checks the state of the selected disk when it is not being accessed by the host. This function can detect disk faults before configuring the system.
This function enables the starting and stopping of the disk diagnosis and the exporting of the results.
The disk diagnosis cannot be executed while the storage system is in operation. Before starting the disk diagnosis, stop host access.
Do not start the disk diagnosis while functions for accessing the disk or changing the RAID group status are running, such as Advanced Copy, RAID Migration, etc.
If disk diagnosis is already running, a new disk diagnosis cannot be started.
Once a disk diagnosis is started, other functions cannot be executed until the diagnosis is complete and the diagnosis results (diagnosis detailed information and error detailed information) are cleared.
- Disk diagnosis cannot be started in the following conditions:
The disk diagnosis or RAID group diagnosis results are not cleared
The RAID group diagnosis is being performed in the storage system
The disk contains a volume that is currently being formatted
The disk contains a volume that is currently being encrypted
The disk contains a volume where a rebuild, copyback, or redundant copy is currently being performed
Releasing the RAID group capacity which belongs to a Thin Provisioning Pool (TPP)
Releasing the RAID group capacity which belongs to a Flexible Tier Pool (FTRP)
The RAID migration is being performed in the storage system
The TPV balancing is being performed in the storage system
The FTRP balancing is being performed in the storage system
The target disks that can be diagnosed using this function are Online disks, Nearline disks, Online SEDs, and Nearline SEDs. Solid State Drives (SSDs) and SSD SEDs cannot be diagnosed.
User Privileges
Availability of Executions in the Default Role
| Default role | Availability of executions |
|---|---|
| Monitor | |
| Admin | |
| StorageAdmin | |
| AccountAdmin | |
| SecurityAdmin | |
| Maintainer |
Refer to "User Roles and Policies" for details on the policies and roles.
Display Contents
In this screen, information of the selected disk is displayed.
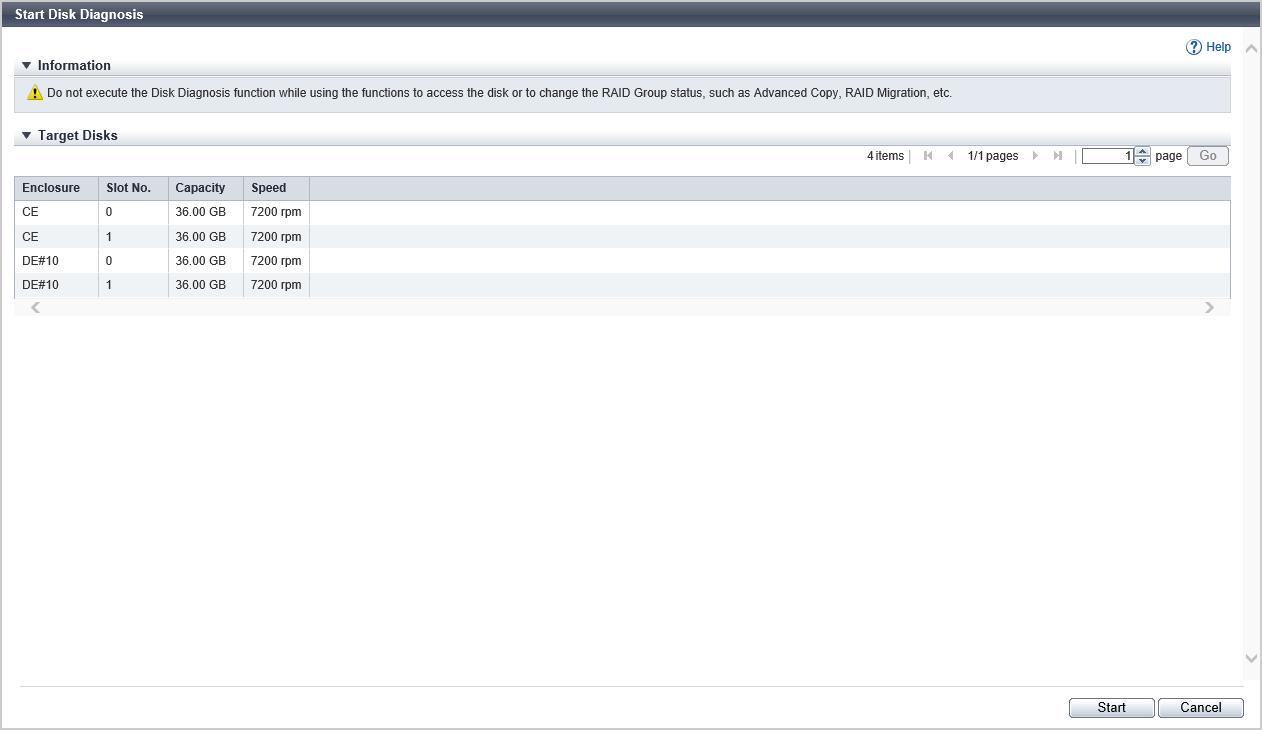
Target Disks
| Item | Description |
|---|---|
|
Enclosure |
The enclosure where the disk is installed is displayed. CE: Controller Enclosure DE: Drive Enclosure CE CE#x DE#yy x: CE number yy: DE number |
|
Slot No. |
The slot number of the enclosure where the disk is installed is displayed. 2.5" CE/DE: 0 - 23 3.5" CE/DE: 0 - 11 3.5" high density DE: 0 - 59 |
|
Capacity |
The capacity of the disk is displayed. |
|
Speed |
The disk speed is displayed. 15000 rpm 10000 rpm 7200 rpm |
[Disk Diagnosis Information] Screen
The disk diagnosis information is displayed.
Click the Function Button to update the disk diagnosis results, to stop disk diagnosis, or to export the diagnosis results.
Disk Diagnosis
| Item | Description |
|---|---|
|
Diagnosis Status |
The status of the disk diagnosis is displayed. Before Diagnosis Diagnosing Complete Stop Error Stopped |
|
Method |
The diagnosis method is displayed.
|
|
Diagnosis Progress |
Progress (0 to 100 %) of the disk diagnosis is displayed. |
Target Disks
| Item | Description |
|---|---|
|
Enclosure |
The enclosure where the disk is installed is displayed. CE: Controller Enclosure (2.5" and 3.5") DE: Drive Enclosure (2.5", 3.5", and 3.5" high density DEs) CE CE#x DE#yy x: CE number yy: DE number |
|
Slot No. |
The slot number of the enclosure where the disk is installed is displayed. Click this item to display the [Detailed Disk Diagnosis Information] Screen. 2.5" CE/DE: 0 - 23 3.5" CE/DE: 0 - 11 3.5" high density DE: 0 - 59 |
|
Capacity |
The capacity of the disk is displayed. |
|
Speed |
The disk speed is displayed. 15000 rpm 10000 rpm 7200 rpm |
|
Diagnosis Status |
The status of the disk diagnosis is displayed. Before Diagnosis Diagnosing Complete Stop Error Stopped Not Target |
|
Diagnosis Result |
The disk diagnosis result is displayed. Normal Cancel Warning |
Function Button
| Button | Description |
|---|---|
[Stop] |
Stops all of the disk diagnosis processes for which the diagnosis status is "Before Diagnosis" and "Diagnosing". |
[Export] |
Exports the diagnosis results. Click this button to display the [Create Disk Diagnosis Result Data] Screen. This button is available only when the diagnosis is stopped with the [Stop] button or when the diagnosis is complete. |
[Refresh] |
Updates to the latest disk diagnosis information. |
[Done] |
Clears the diagnosis result and completes the disk diagnosis. This button is available only when the diagnosis is stopped with the [Stop] button or when the diagnosis is complete. |
[Create Disk Diagnosis Result Data] Screen
| Button | Description |
|---|---|
[Export] |
Creates the diagnosis result data. |
[Cancel] |
Returns to the [Disk Diagnosis Information] screen. |
[Output Disk Diagnosis Result File] Screen
| Button | Description |
|---|---|
[Download] |
Downloads the created diagnosis result file. |
[Done] |
Returns to the [Disk Diagnosis Information] screen. |
[Detailed Disk Diagnosis Information] Screen
Disk Diagnosis
Detailed diagnosis information for the selected disk is displayed.
| Item | Description |
|---|---|
|
Diagnosis Status |
The status of the disk diagnosis is displayed. Before Diagnosis Diagnosing Complete Stop Error Stopped Not Target |
|
Diagnosis Result |
The disk diagnosis result is displayed. Normal Cancel Warning |
|
Diagnosis Progress |
Progress (0 to 100 %) of the disk diagnosis is displayed. |
|
Diagnosed Disk LBA Count |
The number of blocks for which diagnosis is complete is displayed. |
|
Diagnosed Disk LBA Count |
The total number of blocks is displayed. |
|
Hard Error Count |
The number of detected hardware errors is displayed. |
|
SMART Error Count |
The number of Self-Monitoring Analysis and Reporting Technology (S.M.A.R.T.) incidents that are detected is displayed. |
|
Compare Error Count |
The number of detected data compare errors is displayed. |
|
Medium Error Count |
The number of detected medium errors is displayed. The number of errors equals the total of the values between "Head#0" and "Head#11" in the "Error Detail Information" and the value for "Other Error Count". |
|
Recovered Error Count |
The number of detected recovered errors is displayed. "Recovered errors" refer to errors that can be recovered by a retry or other operation during diagnosis. The number of errors equals the total of the values between "Head#0" and "Head#11" in the "Error Detail Information" and the value for "Other Error Count". |
|
No Sense Error Count |
The number of detected No Sense errors is displayed. "No Sense errors" refer to situations where no response is received from a disk within a fixed monitoring time during disk access. |
|
Interface Error Count |
The number of detected interface errors is displayed. An interface error occurs due to one of the following FC loop errors.
|
|
Other Error Count |
The number of other detected errors is displayed. |
Error Detail Information
| Item | Description |
|---|---|
|
Medium Error |
The number of medium errors that are detected on each disk head (Head#0 to Head#11) and the number of other medium errors are displayed. |
|
Recovered Error |
The number of recovered errors that are detected on disk heads (Head#0 to Head#11) and the number of other recovered errors are displayed. |
Operating Procedures
When Starting a Disk Diagnosis
Select which disk(s) disk diagnosis is started from (multiple selections can be made) and click [Start Diagnosis] in [Action].
CautionIf RAID group diagnosis or disk diagnosis is currently being executed in the storage system, a message to that effect appears.
Click the [Start] button.
→ A confirmation screen appears.
Click the [OK] button.
→ Disk diagnosis starts, and the [Disk Diagnosis Information] Screen appears.
After the diagnosis is complete, click the [Done] button.
→ A confirmation screen for deleting the disk diagnosis results appears.
NoteClick the [Slot No.] link to display the [Detailed Disk Diagnosis Information] Screen of the selected disk.
Click the [Refresh] button to display the latest disk diagnosis information.
Click the [Stop] button to stop all of the diagnosis processes. After the process for stopping the diagnosis is complete, the display returns to the [Disk Diagnosis Information] Screen.
Click the [Export] button to download the diagnosis results after the disk diagnosis is stopped or complete. Refer to "When Outputting Disk Diagnosis Result File" for details.
Click the [OK] button.
→ Deletion of the diagnosis results starts.
Click the [Done] button to return to the [Drives] screen.
When Outputting Disk Diagnosis Result File
Click the [Export] button in the [Disk Diagnosis Information] Screen.
→ The [Create Disk Diagnosis Result Data] Screen appears.
Click the [Export] button.
→ The [Output Disk Diagnosis Result File] Screen appears.
Click the [Download] button.
→ A dialog box to download the file appears.
Save the disk diagnosis result file.
The default file name is "DiskDiag_serial number for the storage system_YYYY-MM-DD_hh-mm-ss.txt". (YYYY-MM-DD_hh-mm-ss: the date and time when the [Download] button is displayed in the [Output Disk Diagnosis Result File] screen)
Click the [Done] button to return to the [Disk Diagnosis Information] Screen.