


Expand RAID Group
Overview
This function adds drives to the existing RAID group by using the Logical Device Expansion (LDE) function to dynamically expand the RAID group capacity. This function can also dynamically change the RAID level of an existing RAID group.
RAID group expansion provides the following features without stopping the storage system operation:
RAID group expansion add drives to the existing RAID group in units of one drive. This enables capacity expansion of RAID groups with smaller number of drive expansion.
RAID groups can be expanded and any existing data in these RAID groups is retained.
Requirements for RAID Groups to Expand Capacity
The RAID group status is "Available"
WSVs are not registered
Not registered in TPP
Not registered in FTRP
Not registered as an REC Disk Buffer
Not registered as an Extreme Cache Pool
RAID level is not "RAID5+0" or "RAID6-FR"
The RAID group is not blocked
Rebuild, copyback, or redundant copy is not being performed
The Controlling CM is not being changed
- One of the following functions is not being performed for the volume that is registered in the RAID group
Format Volume
Expand Volume
Encrypt Volume
Storage Migration paths are not created in the volume that is registered in the RAID group
Is not a RAID group with the stripe size expanded (*1)
*1 : A RAID group with more than 128KB of "Stripe Depth" specified in the [RAID Group Detail] screen of [RAID Group (Basic Information)]. Note that the Stripe Depth value for RAID1 cannot be changed.
Requirements for the Storage System to Expand Capacity
The cache mode is "Write Back Mode"
All the CMs are in the normal state
The battery status is "Normal"
LDE is not being performed
RAID group diagnosis is not being performed
Disk diagnosis is not being performed
Application of controller firmware is not being performed
Application of disk firmware is not being performed
Before expanding the RAID group, back up data in all the logical volumes that are stored in the target RAID group to a different location (if not, data cannot be recovered when expansion fails). If expansion fails, data can be recovered from the backed up data.
The expansion of capacity can only be performed for one RAID group at a time.
RAID group expansion cannot be suspended.
- The following operations cannot be used for RAID groups in which RAID group expansion is being performed:
Format Volume
Create Volume
Encrypt Volume
RAID Migration for the volume
Expand Volume
Hot Preventive Maintenance
RAID Group Diagnosis
Disk Diagnosis
For some combinations of RAID levels, LDE cannot be used. Refer to "Availability of LDE for Each Combination of RAID Levels" for details.
RAID groups can be expanded when the RAID group capacity after performing expansion is the same or larger than the current RAID group capacity.
When expanding the drive capacity that configures a RAID group, use the [Start RAID Migration] function instead of this function.
Availability of LDE for Each Combination of RAID Levels (LDE is Available: )
The following table shows the availability of LDE functions (changing RAID levels or capacity expansion by adding drives).
| RAID level after changing | ||||||||
|---|---|---|---|---|---|---|---|---|
| RAID0 | RAID1 | RAID1+0 | RAID5 | RAID5+0 | RAID6 | RAID6-FR | ||
| RAID level before changing | RAID0 | |||||||
| RAID1 | ||||||||
| RAID1+0 | ||||||||
| RAID5 | ||||||||
| RAID5+0 | ||||||||
| RAID6 | ||||||||
| RAID6-FR | ||||||||
User Privileges
Availability of Executions in the Default Role
| Default role | Availability of executions |
|---|---|
| Monitor | |
| Admin | |
| StorageAdmin | |
| AccountAdmin | |
| SecurityAdmin | |
| Maintainer |
Refer to "User Roles and Policies" for details on the policies and roles.
Display Contents
In this screen, the RAID groups for which capacity is to be expanded are displayed.
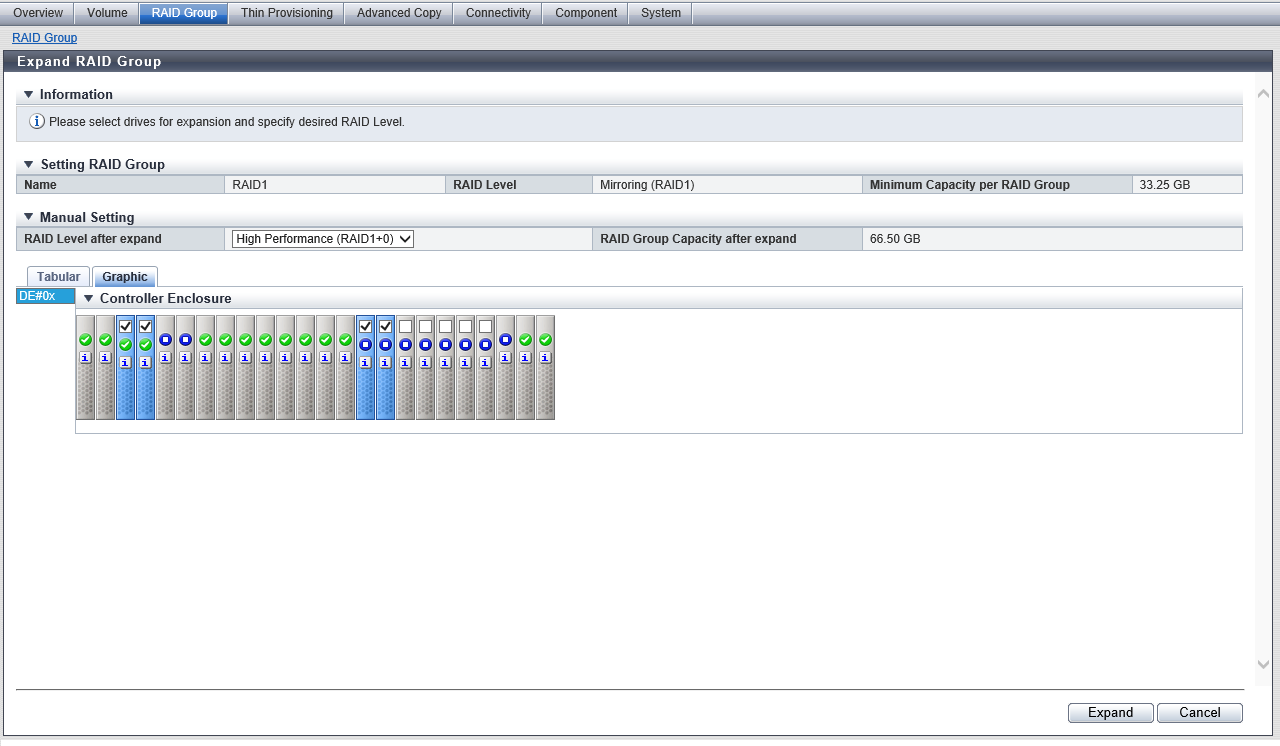
Setting RAID Group
| Item | Description |
|---|---|
|
Name |
The RAID group name is displayed. |
|
RAID Level |
The current RAID level is displayed. High Performance (RAID1+0) High Capacity (RAID5) High Reliability (RAID6) Mirroring (RAID1) Striping (RAID0) |
|
Minimum Capacity per RAID Group |
The current capacity of the RAID group is displayed. |
Settings
Manual Setting
| Item | Description | Setting values |
|---|---|---|
RAID Level after expand |
Select the RAID level after expansion is performed. The selectable RAID levels are displayed as options in the list box. |
High Performance (RAID1+0) High Capacity (RAID5) High Reliability (RAID6) Striping (RAID0) The currently set RAID level is the default value. However, "High Performance (RAID1+0)" is displayed if the current RAID level is RAID1. |
RAID Group Capacity after expand |
The RAID group capacity after expansion is displayed. The capacity is automatically calculated from the selected RAID level and drives. If no drives are selected or if RAID groups cannot be configured with the selected drives, a "-" (hyphen) is displayed. |
Drive Selection
Drives can be selected from the list or the installation image. To switch between the list and the installation image, click the tab.
|
|---|
|
[Tabular] Tab
Click the [Tabular] tab to select drives from the list. The drives that are being used in the selected RAID group and the unused drives that can be used for expansion are displayed on the list.
There are conditions for the ETERNUS DX8900 S4 drive layout. Refer to "Conditions for the ETERNUS DX8900 S4 Drive Layout" for details. Note that these conditions are not applied to other models.
| Item | Description | |||
|---|---|---|---|---|
|
Checkbox to select drives |
The checkbox for the drive being used in the selected RAID group is selected. Select the checkbox for the drive that is to be used after expansion. Clear the checkbox for the drive that is not used after expansion. When selecting drives, refer to "Requirements for selecting drives". |
|||
|
Enclosure |
The enclosure where the drive is installed is displayed. CE: Controller Enclosure (2.5" and 3.5") DE: Drive Enclosure (2.5", 3.5", and 3.5" high density DEs) CE#x DE#yy x: CE number yy: DE number |
|||
|
Slot No. |
The slot number of the enclosure where the drive is installed is displayed. 2.5" CE/DE: 0 - 23 3.5" CE/DE: 0 - 11 3.5" high density DE: 0 - 59 |
|||
|
Drive Type |
The drive type displayed for this item is a combination of the following.
Note that "SED" is also displayed for self encrypting drives and "AF" is also displayed for Advanced Format compliant drives.
|
|||
|
Capacity |
The capacity of the drive is displayed. Caution
|
|||
|
Speed |
The drive speed is displayed. For SSD or SSD SED, a "-" (hyphen) is displayed. 15000 rpm 10000 rpm 7200 rpm |
|||
|
RAID Group |
For the drive being used, the RAID group number and the RAID group name are displayed. For the unused drive, a "-" (hyphen) is displayed. |
[Graphic] Tab
Click the [Graphic] tab to select drives from the drive installation image. The installation images of all the drives installed in the storage system are displayed.
There are conditions for the ETERNUS DX8900 S4 drive layout. Refer to "Conditions for the ETERNUS DX8900 S4 Drive Layout" for details. Note that these conditions are not applied to other models.
| Item | Description | Setting values |
|---|---|---|
DE selection list box |
Select the DE group. Options are displayed in the list box when at least one CE or DE in the DE group is installed in the storage system. Refer to "DE selection list box" for details on the options and DE groups for each model. |
DE#0x DE#1x DE#2x DE#3x DE#4x DE#5x DE#6x DE#7x DE#8x DE#9x DE#Ax DE#Bx DE#Cx DE#Dx DE#Ex DE#Fx |
DE |
Only the CEs or the DEs in the selected DE group that are installed in the storage system are displayed. CE#x DE#yy x: CE number yy: DE number |
|
Checkbox to select drives |
The checkbox for the drive being used in the selected RAID group is selected. Select the checkbox for the drive that is to be used after expansion. Clear the checkbox for the drive that is not used after expansion. For 2.5" CEs or 2.5" DEs, drives are displayed from left to right in ascending order of the slot number. For 3.5" CEs, 3.5" DEs, or 3.5" high density DEs, drives are displayed from bottom left to top right in ascending order of the slot number. Placing the mouse pointer on the icon displays the detailed information of the drive. When selecting drives, refer to "Requirements for selecting drives". |
Conditions for the ETERNUS DX8900 S4 Drive Layout
The drive layout to configure RAID groups in the ETERNUS DX8900 S4 must satisfy the conditions described below.
RAID groups cannot be created if the required conditions are not satisfied.
| RAID level after changing | Drive layout conditions | |
|---|---|---|
| RAID1+0 | Required | Allocate mirroring pair drives to different DEs. |
| Recommended | Allocate striping drives to DEs under as many CEs as possible. Allocate striping drives to as many SAS cascades (*1) as possible. |
|
| RAID5 | Required | Allocate member drives to different DEs. |
| Recommended | Distribute member drives to DEs under as many CEs as possible. Distribute member drives to as many SAS cascades (*1) as possible. |
|
| RAID6 | Required | Allocate two or less member drives to the same DE. |
| Recommended | Distribute member drives to DEs under as many CEs as possible. Distribute member drives to as many SAS cascades (*1) as possible. |
|
| *1 | : | "SAS cascade" for the ETERNUS DX8900 S4 refers to DEs that are attached to one drive interface port. The DEs that are allocated to the same SAS cascade configuration are as follows: DE#x1, DE#x2, and DE#x3 that are connected to CE#x/DI Port#0 (x: 0 - B) DE#x4, DE#x5, DE#x6, and DE#x7 that are connected to CE#x/DI Port#1 (x: 0 - B) DE#x8, DE#x9, DE#xA, and DE#xB that are connected to CE#x/DI Port#2 (x: 0 - B) DE#xC, DE#xD, DE#xE, and DE#xF that are connected to CE#x/DI Port#3 (x: 0 - B) (Example) DE#01, DE#02, and DE#03 that are connected to CE#0/DI Port#0 are on the same SAS cascade. |
- The requirements for selecting drives to change the RAID level are listed below.
- When the RAID level before and after LDE is not changed:
The drives that are used in the RAID group before LDE was performed cannot be deleted.
- When the RAID level is changed after LDE:
- The number of RAID group data drives (*1) after LDE cannot be less than the number before LDE.
*1 : "Number of data drives" indicates the number of logical drives in RAID groups that contain user data. This number is different for each RAID level, as shown below. RAID Level Drive configuration (*2) Number of data drives RAID1+0 nD + nM n RAID5 nD + 1P n RAID6 nD + 2P n RAID1 1D + 1M 1 RAID0 nD n *2 : D: Data drives, M: Mirror drives, P: Parity drives Drives that are not used after changing the RAID level can be deleted from the RAID group. However, not all of the drives can be deleted from a RAID group.
- The number of RAID group data drives (*1) after LDE cannot be less than the number before LDE.
- When the RAID level before and after LDE is not changed:
Operating Procedures
Select the RAID group that is to be expanded and click [Expand] in [Action].
Caution- [Expand] cannot be clicked when the following RAID group is selected.
The RAID level is "RAID5+0" or "RAID6-FR".
The usage is "Extreme Cache Pool"
WSVs are registered
The stripe size is not "64KB"
- [Expand] cannot be clicked when the following RAID group is selected.
Select the RAID level after expansion and the drives that are to be used after expansion. Click the [Expand] button.
→ A confirmation screen appears.
Caution- An error screen appears in the following conditions:
The selected number of drives exceeds the maximum number
The drive layout does not satisfy the required conditions
(Refer to "Conditions for the ETERNUS DX8900 S4 Drive Layout" for details.)
- An error screen appears in the following conditions:
Click the [OK] button.
→ RAID group expansion starts.
Click the [Done] button to return to the [RAID Group] screen.