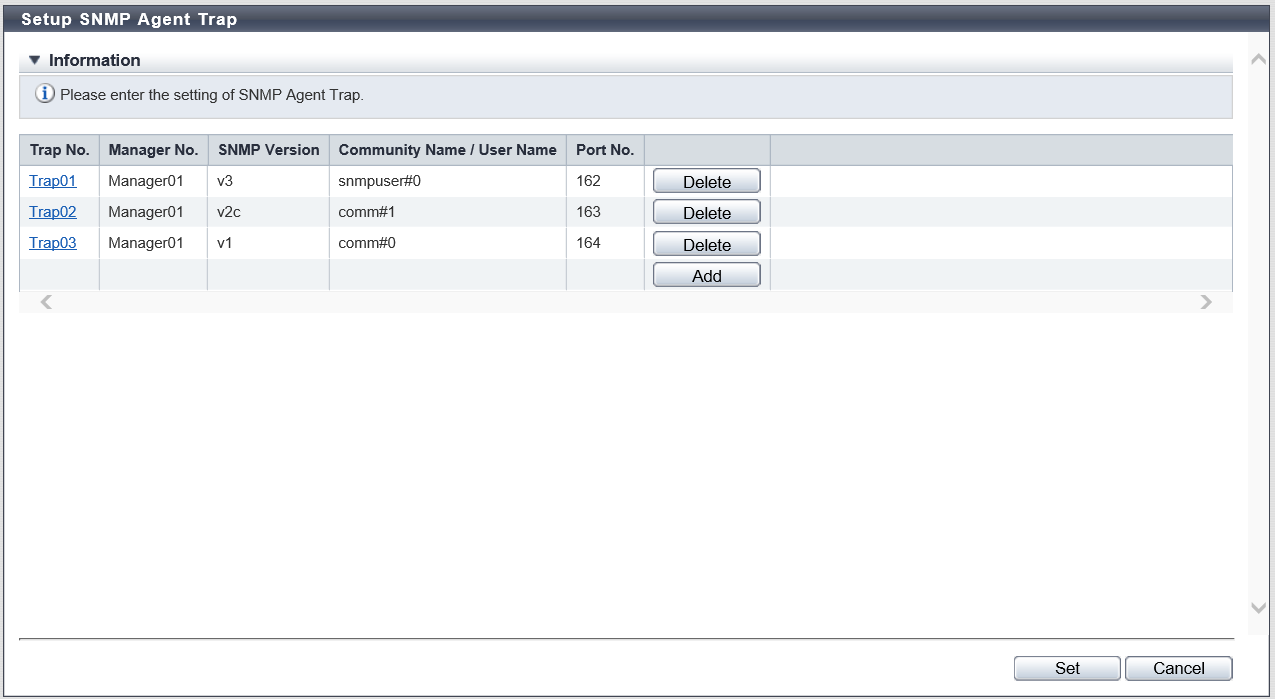
Setup SNMP Agent Trap
Overview
This function notifies events that occur in the storage system to the SNMP Manager by an SNMP Trap.
This function configures the trap destination, the trap version, etc.
Up to ten traps can be specified for each storage system.
If the "SNMP Function" is disabled, this function cannot be used.
When SNMP Manager exists in a different subnetwork from the storage system, specify the IP address or the network address of SNMP Manager in "Allowable IP Address" of the [Setup Network Environment] function.
User Privileges
Availability of Executions in the Default Role
| Default role | Availability of executions |
|---|---|
| Monitor | |
| Admin | |
| StorageAdmin | |
| AccountAdmin | |
| SecurityAdmin | |
| Maintainer |
Refer to "User Roles and Policies" for details on the policies and roles.
Display Contents
The registered traps in the storage system are displayed.
Click the [Add] button to display the [Setup SNMP Agent Trap] Screen. Specify the trap settings in the [Setup SNMP Agent Trap] Screen.

| Item | Description |
|---|---|
Trap No. |
The serial number of the port is displayed. The management number (Trap01 to Trap10) is acquired from the smallest available number. Click the [Trap No.] link to display the [Setup SNMP Agent Trap] Screen. The trap setting can be edited in the [Setup SNMP Agent Trap] screen. |
Manager No. |
The management number (Manager01 to Manager10) of the trap destination manager is displayed. |
SNMP Version |
The trap SNMP version is displayed. v1 v2c v3 |
Community Name/User Name |
If the "SNMP Version" is "v1" or "v2c", the community name used when sending a trap is displayed. If the "SNMP Version" is "v3", the user name used when sending a trap is displayed. |
Port No. |
The port number of the trap destination is displayed. |
Settings
[Setup SNMP Agent Trap] Screen
In this screen, register or edit a trap.
| Item | Description | Setting values |
|---|---|---|
Manager No. |
Select a manager number. The management number of the SNMP Manager, which has been registered using the [Setup SNMP Manager] function, is displayed as an option. |
Manager01 (Default) - Manager10 |
SNMP Version |
Select the trap SNMP version. |
v1 (Default) v2c v3 |
Community Name |
Select the community name used when sending a trap. The community name which has been registered using the [Setup SNMP Agent Community] function, is displayed as an option. If "v1" or "v2c" is selected as the "SNMP Version", the "Community Name" must be specified. |
Community name |
User Name |
Select the user name used when sending a trap. The user name which has been registered using the [Setup SNMP Agent User] function, is displayed as an option. If "v3" has been selected as the "SNMP Version", the "User Name" must be specified. |
User name |
Port No. |
Input the port number of the trap destination. When changing a port number, input a unique port number. |
1 - 65535 162 (Default) |
Function Button
| Button | Description |
|---|---|
[Add] |
Adds an SNMP Agent Trap. If the maximum number of traps have been registered, the [Add] button is not displayed. |
[Delete] |
Deletes an SNMP Agent Trap. If no traps have been registered, the [Delete] button is not displayed. |
Operating Procedures
Click [Setup SNMP Trap] in [Action].
When adding a trap, click the [Add] button.
Click the [Trap No.] link to edit the trap.
→ The [Setup SNMP Agent Trap] screen appears.
NoteTo delete the existing trap, click the [Delete] button for the target trap.
Add or edit the trap information, and click the [OK] button.
→ Returns to the original screen.
Repeat Step 2 and Step 3 to configure information for multiple traps.
After adding or editing the trap information, click the [Set] button.
→ A confirmation screen appears.
Caution- An error screen appears in the following conditions:
"Manager No." or "Community Name/User Name" is not entered
A trap with the same parameters (except the "Trap No.") exists
A trap with the same parameters (except the "Trap No." and the "Port No.") exists
- An error screen appears in the following conditions:
Click the [OK] button.
→ The SNMP Agent Trap setting starts.
Click the [Done] button to return to the [Network] screen.


