


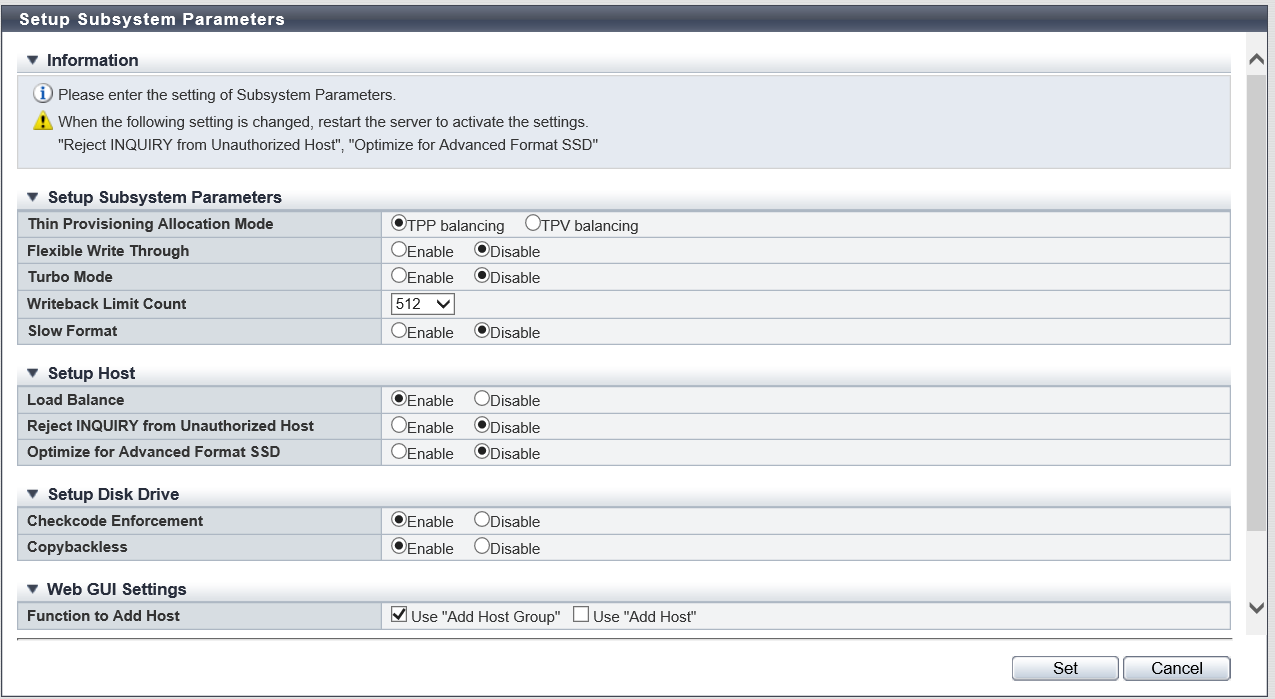
Setup Subsystem Parameters
Overview
This function specifies the subsystem parameters.
Subsystem parameters are the information which controls the storage system operation when it is connected to hosts. The storage system operates according to the specified subsystem parameters, for all the hosts to be connected.
If a change to subsystem parameters is required, the recommended time is when the load is low in the storage system.
Some subsystem parameters may require rebooting of the server or the storage system after changes have been made. Refer to "Conditions for Changing Subsystem Parameters" for details.
Conditions for Changing Subsystem Parameters (Parameters Can Be Changed while Accessing the Host: , Not Available: - , Storage System Reboot Is Required: , Storage System Reboot Is Not Required: -)
| Category | Subsystem parameter | Changing parameters while accessing the host | Rebooting | |
|---|---|---|---|---|
| Storage System | Server | |||
| Setup Subsystem Parameters | 1CM Write Through | - | - | |
| Highland Mode | - | - | ||
| Thin Provisioning Allocation Mode | - | - | ||
| Flexible Write Through | - | - | ||
| Ignore CM-CM Communication Error | - | - | ||
| Read Sequential | - | - | ||
| Write Sequential | - | - | ||
| Turbo Mode | - | - | ||
| Writeback Limit Count | - | - | ||
| Slow Format | - | - | ||
| Setup Host | Load Balance | - | - | |
| Reject INQUIRY from Unauthorized Host | - | |||
| Optimize for Advanced Format SSD | - | |||
| Setup Disk Drive | Critical Disk Mode | - | - | |
| Disk Media Error Check | - | - | ||
| Check BID after Write Command | - | - | ||
| Checkcode Enforcement | - | - | ||
| Reduce the Timeout Period for Nearline Disks | - | - | ||
| Skip Retry when Failed to Access | - | - | ||
| Early Isolate Drive when Read Error | - | - | ||
| HDD Shield | - | - | ||
| Copybackless | - | - | ||
| Setup Read Compare Mode | Read Compare Mode for Online Disks | - | - | |
| Read Compare LBAs for Online Disks | - | - | ||
| Read Compare Mode for Nearline Disks | - | - | ||
| Web GUI Settings | Function to Add Host | - | - | |
| Session Time-out | - | - | ||
| Use Cookies for Session Confirmation | - | - | ||
| Deduplication/Compression Settings | Data Compare when hash collision occurs | - | - | |
User Privileges
Availability of Executions in the Default Role
| Default role | Availability of executions |
|---|---|
| Monitor | |
| Admin | |
| StorageAdmin | |
| AccountAdmin | |
| SecurityAdmin | |
| Maintainer |
Refer to "User Roles and Policies" for details on the policies and roles.
Display Contents
Display Critical System Mode
| Item | Description |
|---|---|
Multipath CSM Order |
Whether or not the storage system received the instruction to enable/disable the Critical System Mode (CSM) from the host is displayed.
This item is available when logged in using a user account with the "Maintenance Operation" policy. |
Settings
Setup Subsystem Parameters
| Item | Description | Setting values |
|---|---|---|
1CM Write Through |
Set whether to shift mode of the storage system from Write Back to Write Through if only 1CM is available in the storage system because of a CM error. This item is available when logged in using a user account with the "Maintenance Operation" policy. |
Enable Disable (Default) |
Highland Mode |
Set this mode when the storage system is used at a high altitude (1800m or higher). Select whether to enable or disable the Highland mode. When Highland mode is enabled, the fan is run at high speed to preserve the fan's cooling effect. This item is available when logged in using a user account with the "Maintenance Operation" policy. |
Enable Disable (Default) |
Thin Provisioning Allocation Mode |
Select "TPP balancing" or "TPV balancing" for the allocation mode of Thin Provisioning. This mode is applied only for Thin Provisioning pools. Note that this setting is not applied for pools that are created by the Flexible Tier (Automated Storage Tiering) function.
(Example) Three TPVs (TPV#0, TPV#1, and TPV#2) are registered in a single TPP. A single TPP is configured with four RAID groups (RAID group#0, RAID group#1, RAID group#2, and RAID group#3).
Caution
|
TPP balancing (Default) TPV balancing |
Flexible Write Through |
Select whether to enable or disable the Flexible Write Through. If "Enable" is selected, the cache action is changed only for specific conditions.
Caution
Note
|
For the ETERNUS DX S5 series Enable Disable (Default) For the ETERNUS AF S3 series Enable (Default) Disable |
Ignore CM-CM Communication Error |
When communication is to be continued even when an error occurs in the paths between the CMs, select "Enable". To suspend communication between the CMs, select "Disable". This item is available when logged in using a user account with the "Maintenance Operation" policy.
Caution
|
Enable Disable (Default) |
Read Sequential |
Select whether to enable or disable detection of the sequentiality when reading the data. This item is available when logged in using a user account with the "Maintenance Operation" policy. Caution
|
Enable (Default) Disable |
Write Sequential |
Select whether to enable or disable detection of the sequentiality when writing the data. This item is available when logged in using a user account with the "Maintenance Operation" policy. Caution
|
Enable (Default) Disable |
Turbo Mode |
Select whether to enable or disable the Turbo Mode. The Turbo Mode is a function to improve performance by using processors in the CMs with an operating frequency that is higher than the specified rated value. This function is also referred to as "Intel® Turbo Boost Technology". This item is displayed for the storage system other than the ETERNUS DX60 S5.
Caution
|
For the ETERNUS DX100 S5/DX200 S5 and the ETERNUS DX8100 S4 Enable Disable (Default) For the ETERNUS DX500 S5/DX600 S5/DX900 S5, the ETERNUS DX8900 S4, and the ETERNUS AF150 S3/AF250 S3/AF650 S3 Enable (Default) Disable |
Writeback Limit Count |
Specify the maximum limit for the Writeback Limit Count (WLC). The WLC is the number of commands that are issued when writing data back to the drive. When specifying a larger WLC, data writeback speed is increased. However, resources are used for data writeback so I/O performance may be affected. Caution
|
For the ETERNUS DX60 S5: 128, 256, 512, 1024 For the ETERNUS DX100 S5/DX200 S5 and the ETERNUS AF150 S3/AF250 S3: 128, 256, 512, 1024, 2048 For the ETERNUS DX500 S5 and the ETERNUS DX8100 S4 128, 256, 512, 1024, 2048, 3072 For the ETERNUS DX600 S5/DX900 S5, the ETERNUS DX8900 S4, and the ETERNUS AF650 S3 128, 256, 512, 1024, 2048, 3072, 6144 Default: 512 |
Slow Format |
Select whether to enable or disable the slow format. If the format function for this storage system starts, the performance of the volumes in operation may be influenced more than when the format function is used in older storage systems. Select "Enable" to revert the speed of the format process to the speed for older storage systems. This may reduce the performance impact to volumes in operation. |
Enable Disable (Default) |
Setup Host
| Item | Description | Setting values |
|---|---|---|
Load Balance |
Select whether to enable or disable the load balance for the storage system. The Load Balance function delays execution for newly received commands when the command execution time in the storage system exceeds the specific value. Select "Enable" to respond with the sense that is specified in the "Load Balance Response" field of the host response setting. Caution
|
Enable (Default) Disable |
Reject INQUIRY from Unauthorized Host |
Select whether to reject the "Inquiry" command from an unauthorized host. Select the "Enable" checkbox to reject. When the "Inquiry" command is rejected, storage system returns an Affinity Error (5/25/81) for the "Inquiry" command from the unauthorized host. When the command is not rejected, the storage system responds normally. Caution
|
Enable Disable (Default) |
Optimize for Advanced Format SSD |
Select whether to perform a 4K byte alignment access from the host (host access that is aligned to 4K byte) to the volumes in RAID groups or TPPs configured with SSDs or SSD SEDs. Select "Enable" to perform a 4K byte alignment access. |
Enable (Default) Disable |
Setup Disk Drive
| Item | Description | Setting values |
|---|---|---|
Critical Disk Mode |
Select whether or not to shorten the monitoring time of the disk access. Select the "Enable" checkbox to shorten the monitoring time. This item is available when logged in using a user account with the "Maintenance Operation" policy. |
Enable (Default) Disable |
Disk Media Error Check |
Select the checking method of disk medium errors from "Mode 1" and "Mode 2". This item is available when logged in using a user account with the "Maintenance Operation" policy. |
Mode1 (Default) Mode2 |
Check BID after Write Command |
Select whether to enable or disable the Block ID (BID) check after responding to a write command. This item is available when logged in using a user account with the "Maintenance Operation" policy. |
Enable Disable (Default) |
Checkcode Enforcement |
Select whether to enable or disable the Checkcode Enforcement mode.
Caution
|
Enable (Default) Disable |
Reduce the Timeout Period for Nearline Disks |
Select whether to enable or disable for the timeout period reduction of Nearline disks. This item is available when logged in using a user account with the "Maintenance Operation" policy.
Caution
|
Enable Disable (Default) |
Skip Retry when Failed to Access |
Select whether to skip or not skip retrying when drive access fails. This item is available when logged in using a user account with the "Maintenance Operation" policy.
Caution
|
Enable Disable (Default) |
Early Isolate Drive when Read Error |
Select whether to give priority to isolate a drive in which a drive read error is detected. This item is available when logged in using a user account with the "Maintenance Operation" policy.
Caution
|
Enable Disable (Default) |
HDD Shield |
Select whether to enable or disable the protect (shield) function for the drive. The HDD Shield function temporarily isolates (protects) a drive in which an error is detected from the storage system and performs a diagnosis. If the drive is diagnosed as being normal, the drive is reactivated in the storage system. However, if disk errors other than HDD Shield occur or the error count exceeds the threshold, the drive is not reactivated. This item is available when logged in using a user account with the "Maintenance Operation" policy. Caution
|
Enable (Default) Disable |
Copybackless |
Select whether to enable or disable the Copybackless function. The Copybackless function registers the rebuilding destination hot spare in the RAID group after rebuilding is complete instead of performing a copyback operation. The failed drive in the RAID group is changed to a hot spare after the rebuilding is complete. If the failed drive is replaced with a normal drive, the replacement drive can be used as a hot spare. After the redundant copy is complete, this function is performed in the same way as the rebuilding function. Both types of hot spares (Global Hot Spares and Dedicated Hot Spares) can be the target hot spares for this function. The Copybackless function is performed when the following hot spares are selected.
Caution
Note
|
Enable (Default) Disable |
Setup Read Compare Mode
| Item | Description | Setting values |
|---|---|---|
Read Compare Mode for Online Disks |
Set the interval for read and compare operations in the data disk (online disk). When "0" is specified in this item, the read and compare operations are not performed. This item is available when logged in using a user account with the "Maintenance Operation" policy. When the host requests data writing, the storage system reads and/or compares the data in the specified interval. If an "Error" is detected during the reading/comparing process, the error is processed in the same way as when detecting a normal disk error. Caution
|
0 - 255 16 (Default) |
Read Compare LBAs for Online Disks |
Set whether or not to compare the written volumes to all the Logical Block Addresses (LBAs) in the read and compare operations in data disks (online disks). This item is available when logged in using a user account with the "Maintenance Operation" policy. Caution
|
Compare all LBAs (Default) Compare only initial LBA |
Read Compare Mode for Nearline Disks |
Set the interval for read and compare operations in the data disk (Nearline disk). When "0" is specified in this item, the read and compare operations are not performed. This item is available when logged in using a user account with the "Maintenance Operation" policy. When the host requests data writing, the storage system reads and/or compares the data in the specified interval. If an "Error" is detected during the reading/comparing process, the error is processed in the same way as when detecting a normal disk error. Caution
|
0 - 255 16 (Default) |
Web GUI Settings
| Item | Description | Setting values |
|---|---|---|
Function to Add Host |
Select which function for adding hosts is to be used.
Caution
Note
|
Selected: Select Cleared: Not select Default: Use "Add Host Group": selected Use "Add Host": cleared |
| Session Time-out | Specify the time (in minutes) before Web GUI is automatically logged out. The changed session timeout is applied for the Web GUI operations that are performed after this item is changed. |
5 - 60 60 (Default) |
| Use Cookies for Session Confirmation | Select whether to use Cookies for session confirmations when accessing the storage system from Web GUI.
Caution
|
Enable Disable Default:
|
Deduplication/Compression Settings
| Item | Description | Setting values |
|---|---|---|
Data Compare when hash collision occurs |
Select whether to compare the entire size of the data if the same hash value is detected when using the Deduplication/Compression function. "Hash collision" indicates that the same hash value is generated from different data. By selecting "Enable" for this setting, if the hash value matches, the entire size of the data is compared with the existing data to determine whether it is duplicated. This item is only displayed when the Deduplication/Compression function is enabled in the storage system. Caution
|
Enable Disable (Default) |
Operating Procedures
Click [Setup Subsystem Parameters] in [Action].
Specify the parameters, and click the [Set] button.
→ A confirmation screen appears.
Click the [OK] button.
→ Setting of the subsystem parameter starts.
Click the [Done] button to return to the [System Settings] screen.