


Create Volume
Overview
This function creates new volumes.
The following types of volumes can be created.
Standard
The most commonly used volumes. Volumes are created in RAID groups or External RAID Groups.
Wide Striping Volume (WSV)
Volumes that are configured by multiple RAID group areas that are concatenated with striping to improve performance.
Thin Provisioning Volume (TPV)
Volumes that are created in TPPs. TPVs can also be used as the copy destination for SnapOPC or SnapOPC+.
Snap Data Volume (SDV)
Copy destination volumes for SnapOPC or SnapOPC+ that are created in the RAID group.
Snap Data Pool Volume (SDPV)
Volumes used as expansion areas for SDV that are created in the RAID group.
NAS Volume
Volumes used for NAS system operation (hereinafter referred to as "NAS user volume") in the Unified Storage environment that are created in TPPs.
Deduplication/Compression Volume
Volumes that have Deduplication, Compression, or both Deduplication and Compression enabled. The volumes are created in TPPs that have the Deduplication/Compression function enabled.
The ETERNUS DX60 S5 does not support the encryption function.
Volumes are formatted automatically when they are created in RAID groups or TPPs. If the error message "An internal resource is insufficient." appears after volumes are created, a format of volumes may have failed. Check the "Status" of the created volumes in the [Volume] screen. Refer to the [Volume (Basic Information)] function for details. Volumes in the "Readying" state have not been formatted. Wait until the currently running format processes are complete and reformat the relevant volumes. Refer to the [Format Volume] function for details.
- The maximum number of volumes that can be created is reduced in the following conditions:
When TPPs exist in the storage system
When concatenated volumes exist in the storage system
When REC Disk Buffers exist in the storage system
When Extreme Cache exists in the storage system
When Extreme Cache Pools exist in the storage system
When volumes undergoing RAID migration exist
When volumes undergoing Balancing TPV exist
When the Automated Storage Tiering feature is enabled
When Deduplication, Compression, or both Deduplication and Compression are enabled for the TPP
When the Veeam Storage Integration License is registered
Volumes are formatted automatically when they are created in RAID groups or TPPs. Standard, WSV, TPV, and SDV can be accessed from the host when host affinity is set after volume creation. NAS user volumes can be accessed from the host when NAS interface is set and shared folder is created after volume creation.
External Volumes are not formatted after a volume creation. They inherit the External LU Information of the External RAID Group (or the External Drive).
When a volume is created manually (*1), the volume number can be specified. Note that volumes have to be created one at a time. Multiple volumes cannot be created when specifying the volume number for a new volume.
*1 : Volumes can be created manually for WSVs or when drives are selected manually for Standard type volumes, SDVs, SDPVs, TPVs, NAS volumes, or Deduplication/Compression Volumes. When "Automatic" is selected to create a volume or when "Manual" is selected but a volume number is not specified, the volume number is allocated when a volume is created from the smallest unused decimal number in ascending order.
When "Manual" is selected, create the specified number of volumes by using the maximum free space that is available in the RAID group. Specifying a "Capacity" value is not required. "Standard", "WSV", and "SDPV" type volumes are created by using the maximum free space.
This function cannot be used to create an ODX Buffer volume. Refer to the [Create ODX Buffer Volume] function for details.
The Extreme Cache mode (enabled or disabled) of the storage system and the set states of the Extreme Cache mode for each volume are not linked. Regardless of the mode of the Extreme Cache for the storage system, the default state of Extreme Cache for each volume is "Enable". Note that External Volumes do not use Extreme Cache. Refer to the [Setup Extreme Cache] function in the [System] navigation for details about the Extreme Cache mode of the ETERNUS DX500 S5/DX600 S5/DX900 S5 and the ETERNUS DX8900 S4.
The Extreme Cache Pool mode (enabled or disabled) of the storage system and the set states of Extreme Cache Pool for each volume are not linked. Regardless of the mode of the Extreme Cache Pool for the storage system, the default state of Extreme Cache Pool for each volume is "Enable". Note that External Volumes do not use Extreme Cache Pool. Refer to the [Setup Extreme Cache Pool] function in the [System] navigation for details about the Extreme Cache Pool mode of the ETERNUS DX100 S5/DX200 S5.
Enabling or disabling Extreme Cache for each volume can be performed with Web GUI, CLI, or ETERNUS SF Storage Cruiser. Use the [Modify Cache Parameters] function to change the setting from Web GUI (for the ETERNUS DX500 S5/DX600 S5/DX900 S5 and the ETERNUS DX8900 S4).
Enabling or disabling Extreme Cache Pool for each volume can be performed with Web GUI or CLI. Use the [Modify Cache Parameters] function to change the setting from Web GUI (for the ETERNUS DX100 S5/DX200 S5).
In this manual, "volumes" include "External Volumes" if differentiation is not specifically required.
User Privileges
Availability of Executions in the Default Role
| Default role | Availability of executions |
|---|---|
| Monitor | |
| Admin | |
| StorageAdmin | |
| AccountAdmin | |
| SecurityAdmin | |
| Maintainer |
Refer to "User Roles and Policies" for details on the policies and roles.
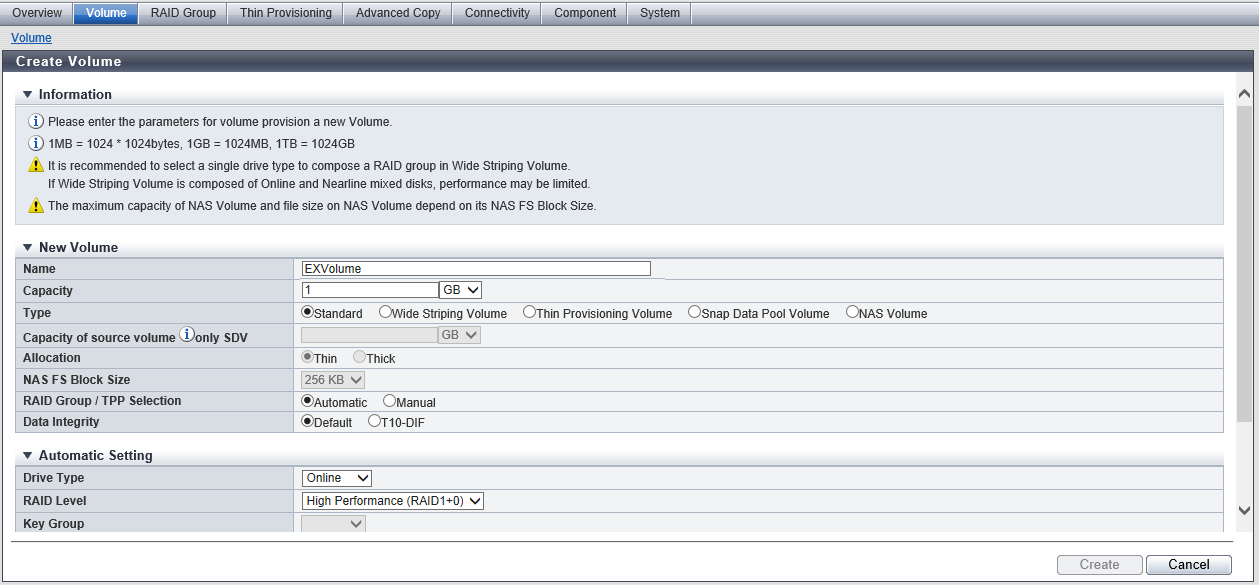
Settings
In this screen, specify the details of the volumes that are to be created.
| When creating Standard type volumes, SDVs, or SDPVs | |||
|---|---|---|---|
|
When creating TPVs |
|
|---|---|
|
When creating WSVs |
|---|
|
| When creating NAS user volumes | ||||||||||||||||||||||||||||||||||||||||||||||||||
|---|---|---|---|---|---|---|---|---|---|---|---|---|---|---|---|---|---|---|---|---|---|---|---|---|---|---|---|---|---|---|---|---|---|---|---|---|---|---|---|---|---|---|---|---|---|---|---|---|---|---|
|
||||||||||||||||||||||||||||||||||||||||||||||||||
-
- Procedures for when the NAS user volume creation is not completed successfully
Confirm that the general status (detail) of the storage system and the status of the NAS Engine are both "Normal". If the status is not "Normal", the storage system requires maintenance.
The storage system general status (detail) can be checked in the [Storage] screen. Refer to the [Storage] function for details.
The NAS Engine status can be checked in the [Internal Parts] tab of the [Controller Module Detail] screen. Refer to the [Controller Module] function for details.
If the NAS user volume was created, delete the relevant volume. If the NAS user volume cannot be deleted, the storage system requires maintenance.
For the NAS user volume, "File" is displayed as the usage in the volume list screen ("NAS Data" is displayed as the usage details of the volume detailed information screen). Refer to the [Volume (Basic Information)] function for details.
Create the NAS user volume again. Confirm that the volume creation was successfully completed.
When creating Deduplication/Compression Volumes |
|---|
|
Setting Items for Each Volume Type When Selecting "Automatic" (Required settings: )
| Setting items | Standard | Block -TPV |
NAS -TPV |
Dedup -TPV |
SDV | SDPV | |
|---|---|---|---|---|---|---|---|
| New Volume | Name | ||||||
| Capacity | - | ||||||
| Type | |||||||
| Capacity of source volume only SDV | - | - | - | - | - | ||
| Deduplication | - | - | - | - | |||
| Compression | - | - | - | - | |||
| Allocation | - | - | - | - | |||
| NAS FS Block Size | - | - | - | - | - | ||
| RAID Group / TPP Selection | Automatic | ||||||
| Data Integrity | - | - | - | - | - | ||
| Automatic Setting | Drive Type | ||||||
| RAID Level | |||||||
| Key Group | - | - | - | ||||
| Number of Volumes | "1" (fixed) | ||||||
| Start of Suffix | - | ||||||
| Digits of Suffix | - | ||||||
| Encryption by CM | |||||||
Setting Items for Each Volume Type When Selecting "Manual" (Required settings: )
| Setting items | Setting items for normal use | ||||||||
|---|---|---|---|---|---|---|---|---|---|
| Standard | External -Standard (*1) |
Block -TPV |
NAS -TPV |
Dedup -TPV |
SDV | SDPV | WSV (*2) | ||
| New Volume | Name | ||||||||
| Capacity | - | - | |||||||
| Type | |||||||||
| Capacity of source volume only SDV | - | - | - | - | - | - | - | ||
| Use External Drive | - | - | - | - | - | - | |||
| Deduplication | - | - | - | - | - | - | |||
| Compression | - | - | - | - | - | - | |||
| Allocation | - | - | - | - | - | - | |||
| NAS FS Block Size | - | - | - | - | - | - | - | ||
| RAID Group / TPP Selection | Manual | - | Manual | - | |||||
| Data Integrity | - | - | - | - | - | - | - | ||
| Setting items | Setting items when "Volume No." is specified | Setting items when "Use all Largest Free Space" is specified | ||||||||||
|---|---|---|---|---|---|---|---|---|---|---|---|---|
| Standard | External -Standard (*1) |
Block -TPV |
NAS -TPV |
Dedup -TPV |
SDV | SDPV | WSV (*2) | Standard | SDPV | WSV (*2) | ||
| New Volume | Name | |||||||||||
| Capacity | - | - | - | - | - | |||||||
| Type | ||||||||||||
| Capacity of source volume only SDV | - | - | - | - | - | - | - | - | - | - | ||
| Use External Drive | - | - | - | - | - | - | - | - | ||||
| Deduplication | - | - | - | - | - | - | - | - | - | |||
| Compression | - | - | - | - | - | - | - | - | - | |||
| Allocation | - | - | - | - | - | - | - | - | - | |||
| NAS FS Block Size | - | - | - | - | - | - | - | - | - | - | ||
| RAID Group / TPP Selection | Manual | - | Manual | - | Manual | - | ||||||
| Data Integrity | - | - | - | - | - | - | - | - | - | |||
| Setting items | Setting items for normal use | ||||||||
|---|---|---|---|---|---|---|---|---|---|
| Standard | External -Standard (*1) |
Block -TPV |
NAS -TPV |
Dedup -TPV |
SDV | SDPV | WSV (*2) | ||
Manual Setting or Manual Setting (Volume Information) |
Use all Largest Free Space | - | |||||||
| Volume No. | |||||||||
| Start of Suffix | - | ||||||||
| Digits of Suffix | - | ||||||||
| Encryption by CM | - | - | - | - | |||||
Number of Volumes (RAID group) |
- | - | - | - | - | ||||
Number of Volumes (TPP) |
- | - | - | - | - | - | |||
Number of Volumes (WSV) |
- | - | - | - | - | - | - | ||
| Checkbox to select External RAID Groups | - | - | - | - | - | - | - | ||
Manual Setting (Select RAID Group Information) |
Drive Type | - | - | - | - | - | - | - | |
| RAID Level | - | - | - | - | - | - | - | ||
| Number of Member Drives | - | - | - | - | - | - | - | ||
| Setting items | Setting items when "Volume No." is specified | Setting items when "Use all Largest Free Space" is specified | ||||||||||
|---|---|---|---|---|---|---|---|---|---|---|---|---|
| Standard | External -Standard (*1) |
Block -TPV |
NAS -TPV |
Dedup -TPV |
SDV | SDPV | WSV (*2) | Standard | SDPV | WSV (*2) | ||
Manual Setting or Manual Setting (Volume Information) |
Use all Largest Free Space | - | ||||||||||
| Volume No. | ||||||||||||
| Start of Suffix | - | - | - | - | - | - | - | - | ||||
| Digits of Suffix | - | - | - | - | - | - | - | - | ||||
| Encryption by CM | - | - | - | - | ||||||||
Number of Volumes (RAID group) |
"1" (fixed) | - | - | - | - | "1" (fixed) | "1" (fixed) | - | - | |||
Number of Volumes (TPP) |
- | - | "1" (fixed) | - | "1" (fixed) | - | - | - | - | - | - | |
Number of Volumes (WSV) |
- | - | - | - | - | - | - | "1" (fixed) | - | - | ||
| Checkbox to select External RAID Groups | - | Select one checkbox. | - | - | - | - | - | - | - | - | - | |
Manual Setting (Select RAID Group Information) |
Drive Type | - | - | - | - | - | - | - | - | - | ||
| RAID Level | - | - | - | - | - | - | - | - | - | |||
| Number of Member Drives | - | - | - | - | - | - | - | - | - | |||
| *1 | : | External Volumes that are created in the External RAID Groups. It is referred to as "External-Standard" in this manual. |
| *2 | : | The following items are advanced settings. It is not necessary to change the default value for normal use.
|
New Volume
| Item | Description | Setting values |
|---|---|---|
Name |
Specify the volume name. An existing volume name cannot be specified. Volume names starting with "$SYSVOL", "$VVOL_META", or "$DATA_CNTNR" cannot be used. When creating multiple volumes at the same time, the new volumes are named automatically. Refer to "Naming Conventions for Creating Volumes" for details. |
Up to 32 alphanumeric characters, symbols (except "," (comma) and "?"), and spaces |
Capacity |
Specify the volume capacity and select the unit of capacity. Up to a 15-digit number including the "." (decimal point) can be input. Note that when "MB" is selected, the specified value is rounded down to the nearest whole number. When "GB" or "TB" is selected, the specified value is converted to "MB" and rounded down to the nearest whole number. Caution
Note
|
When creating Standard volumes, WSVs, or TPVs: 24 MB - 128 TB (numeric characters) When creating SDPVs: 1 GB - 2 TB (numeric characters) When creating NAS volumes: 400 GB - 128 TB (numeric characters) (When the NAS FS block size is "256 KB" or "32 KB") 400 GB - 32 TB (numeric characters) (When the NAS FS block size is "8 KB") 1 GB - 2 TB (numeric characters) Unit: MB/GB/TB |
Type |
Specify the volume type. When the [Create Volume] function is executed from the RAID group list, "Standard", "Snap Data Volume", or "Snap Data Pool Volume" is displayed. If the selected RAID group type is "RAID6-FR", only "Standard" volumes are displayed. When the [Create Volume] function is executed from the Thin Provisioning Pool list, only "Thin Provisioning Volume" is displayed. When the Advanced Copy function license has been registered, "Snap Data Volume" is displayed. When the Advanced Copy function license has been registered or when the storage system is being used in the Unified Storage environment, "Snap Data Pool Volume" is displayed. "NAS Volume" is displayed only when all of the following conditions are satisfied:
Note
|
Standard Wide Striping Volume Thin Provisioning Volume Snap Data Volume Snap Data Pool Volume NAS Volume |
Capacity of source volume only SDV |
Specify the copy source volume capacity and select the unit of capacity. This item can only be specified when "Snap Data Volume" is selected for "Type". |
24 MB - 128 TB (numeric characters) Unit: TB/GB/MB |
Use External Drive |
To create a volume using an External Drive, select the "Enable" checkbox. This checkbox can be selected or cleared only when "Standard" is specified for "Type". If the "Enable" checkbox is selected, the External RAID Group List is displayed. This item is displayed only if the Non-disruptive Storage Migration License has been registered. Note
|
"Enable" checkbox Selected Cleared |
Deduplication |
Select whether to use the volume as a Deduplication or Compression target volume. This item is only displayed when the Deduplication/Compression for the storage system is enabled. This item can only be specified when "Thin Provisioning Volume" is selected for "Type". Volumes are created in the TPP according to the selected items. Refer to "Volumes That Are Created in the TPP According to the Selected Items" for details. |
Enable Disable |
Compression |
||
Allocation |
Select the allocation method of the volume.
This item can only be specified when meeting all the following conditions.
|
Thin Thick |
NAS FS Block Size |
Select the block size of the NAS file system (NAS user volume). By selecting an appropriate "NAS FS Block Size" for the user data size (file size) to be created, the storage efficiency of the NAS user volume improves. This item is displayed only when "NAS Volume" can be selected as the volume type. Caution
Note
|
256 KB 32 KB 8 KB |
RAID Group / TPP Selection |
Specify the selection method for the RAID group or the Thin Provisioning Pool.
When the [Create Volume] function is executed from the RAID group list or the Thin Provisioning Pool list, only "Manual" is displayed. Caution
|
Automatic Manual |
Data Integrity |
Specify the volume protection method.
This item can only be specified when meeting all the following conditions.
Caution
|
Default T10-DIF |
Volumes That Are Created in the TPP According to the Selected Items (Available: , N/A: -)
| Condition | Volumes that are to be created | Deduplication/Compression setting for the destination TPP | ||||
|---|---|---|---|---|---|---|
| Deduplication | Compression | Only Deduplication is enabled |
Only Compression is enabled |
Both Deduplication and Compression are enabled |
Both Deduplication and Compression are disabled |
|
| Enable | Enable | Deduplication/Compression Volumes where both Deduplication and Compression are enabled | - | - | - | |
| Enable | Disable | Deduplication/Compression Volumes where only Deduplication is enabled | - | - | - | |
| Disable | Enable | Deduplication/Compression Volumes where only Compression is enabled | - | - | - | |
| Disable | Disable | TPVs for SAN where both Deduplication and Compression are disabled | ||||
Automatic Setting
| Item | Description | Setting values | |||
|---|---|---|---|---|---|
Drive Type |
Specify the drive type. The installed drive determines the selectable drive types that are displayed as options. If "Enable" is selected for "Deduplication" or "Compression", the drive types of the TPPs that have the Deduplication/Compression setting enabled are displayed. If "Disable" is selected for "Deduplication" and "Compression", the drive types of all the TPPs that are registered in the storage system are displayed. Note
|
||||
RAID Level |
Select the RAID level. The specified volume type and drive type determine the selectable RAID levels that are displayed as options. If "Enable" is selected for "Deduplication" or "Compression", the RAID levels of the TPPs that have the Deduplication/Compression setting enabled are displayed. If "Disable" is selected for "Deduplication" and "Compression", the RAID levels of all TPPs that are registered in the storage system are displayed. |
High Performance (RAID1+0) High Capacity (RAID5) High Reliability (RAID6) High Reliability (RAID6-FR) Reliability (RAID5+0) Mirroring (RAID1) Striping (RAID0) |
|||
Key Group |
When creating volumes in the RAID group that configures the key group (*1), select "Enable". When creating volumes in a RAID group that is not registered in the key group, select "Disable". This setting is only available if the volume type is "Standard", "SDV", or "SDPV", and if the drive type is "Online SED", "Nearline SED", or "SSD SED". Only the available setting (Enable or Disable) is displayed as an option. For other drive types, the field is blank.
|
Enable Disable Blank |
|||
Number of Volumes |
Specify the number of volumes to be created.
Note
|
For volumes other than "NAS Volume" ETERNUS DX60 S5: 1 (Default) - 1024 ETERNUS DX100 S5: 1 (Default) - 4096 ETERNUS DX200 S5: 1 (Default) - 8192 ETERNUS DX500 S5/DX600 S5: 1 (Default) - 16384 ETERNUS DX900 S5: 1 (Default) - 1024 ETERNUS DX8100 S4: 1 (Default) - 16384 ETERNUS DX8900 S4: 1 (Default) - 1024 ETERNUS AF150 S3: 1 (Default) - 4096 ETERNUS AF250 S3: 1 (Default) - 8192 ETERNUS AF650 S3: 1 (Default) - 16384 For "NAS Volume" 1 (fixed) |
|||
Start of Suffix |
Select the suffix starting number to be added to the name of volumes that are to be created. This item must be set if the default value "0" is changed. If "1" is specified for "Number of Volumes", "Start of Suffix" cannot be selected. This item is not displayed when "NAS Volume" is selected for "Type". |
0 (Default) - 99999 |
|||
Digits of Suffix |
Select the number of digits to be added to the name of volumes that are to be created. This item must be set if the default value "1" is changed. If "1" is specified for "Number of Volumes", "Digits of Suffix" cannot be selected. This item is not displayed when "NAS Volume" is selected for "Type". |
For the ETERNUS DX60 S5/DX100 S5/DX200 S5 and ETERNUS AF150 S3/AF250 S3: 1 - 4 For the other models: 1 (Default) - 5 |
|||
Encryption by CM |
Select whether to encrypt (On) or not encrypt (Off) the new volumes. "On" cannot be selected in the following conditions.
The combination of this setting and the drive type setting defines the RAID group or Thin Provisioning Pool in which the volumes are created. For the ETERNUS DX60 S5, this item is not displayed.
|
On Off |
Manual Setting (When Creating Standard Type Volumes, SDVs, or SDPVs)
| Item | Description | Setting values |
|---|---|---|
Use all Largest Free Space |
Select the "Enable" checkbox to create the specified number of volumes with the largest available free space in the RAID group. This checkbox can be selected or cleared only when "Type" is "Standard" or "SDPV". If the "Enable" checkbox is selected, the specified number of volumes in the "Number of Volumes" field are created in the free space that is displayed as "Largest Free Space" for each RAID group. Caution
|
"Enable" checkbox Selected Cleared |
Start of Suffix |
Select the suffix starting number to be added to the name of volumes that are to be created. This item must be set if the default value "0" is changed. "Start of Suffix" cannot be selected in the following conditions.
|
0 (Default) - 99999 |
Digits of Suffix |
Select the number of digits to be added to the name of volumes that are to be created. This item must be set if the default value "1" is changed. "Digits of Suffix" cannot be selected in the following conditions.
|
For the ETERNUS DX60 S5/DX100 S5/DX200 S5 and the ETERNUS AF150 S3/AF250 S3: 1 - 4 For the other models: 1 (Default) - 5 |
Volume No. |
When specifying the volume number for a new volume, select the "Set Value" checkbox and input the volume number. Caution
|
"Set Value" checkbox Selected Cleared Volume No. Numeric characters (decimal) The following volume numbers can be used for each model: ETERNUS DX60 S5: 0 (Default) - 1023 ETERNUS DX100 S5: 0 (Default) - 4095 ETERNUS DX200 S5: 0 (Default) - 8191 ETERNUS DX500 S5/DX600 S5: 0 (Default) - 16383 ETERNUS DX900 S5: 0 (Default) - 65534 ETERNUS DX8100 S4: 0 (Default) - 16383 ETERNUS DX8900 S4: 0 (Default) - 65534 ETERNUS AF150 S3: 0 (Default) - 4095 ETERNUS AF250 S3: 0 (Default) - 8191 ETERNUS AF650 S3: 0 (Default) - 16383 |
Encryption by CM |
Select whether to encrypt (On) or not encrypt (Off) the new volumes. When the encryption mode is disabled, "On" cannot be selected. For the ETERNUS DX60 S5, this item is not displayed. Caution
|
On Off |
RAID Group List
| Item | Description | Setting values |
|---|---|---|
RAID Group Name |
The RAID group name is displayed. |
|
Drive Type |
The type of drive that configures the RAID group is displayed. If multiple drive types are used in the RAID group, the drive type is displayed as described below.
|
|
RAID Level |
The RAID level is displayed. Only RAID groups with a RAID level that can create the specified volume type are displayed on the list. High Performance (RAID1+0) High Capacity (RAID5) High Reliability (RAID6) High Reliability (RAID6-FR) Reliability (RAID5+0) Mirroring (RAID1) Striping (RAID0) |
|
Number of Drives |
The number of drives is displayed. |
|
Number of Volumes |
Specify the number of volumes to be created in each RAID group. Click the [Recalculation of Max Count] button to display the maximum number of volumes that can be created in each RAID group with the specified capacity. When the volume capacity is not specified (including when "Use all Largest Free Space" is selected), the maximum number of volumes that can be created for each RAID group is displayed. When "Encryption by CM" is "On", volumes cannot be created in a RAID group with "Online SED", "Nearline SED", or "SSD SED" for the drive type. For details on the maximum number of volumes for each model, refer to [The maximum number of volumes that can be created for each model]. Note
|
1 - 128 0 (Default) |
Total Capacity |
The total capacity of the RAID groups is displayed. |
|
Total Free Space |
The total capacity of free space in the RAID group is displayed. "Free space" means an area in the RAID group where no volume is created, and dispersed areas which became free by creating and deleting a volume. |
|
Largest Free Space |
The maximum capacity of free space in the RAID group is displayed. |
|
Encryption |
If "Online SED", "Nearline SED", or "SSD SED" is selected for the drive type, the encryption status (the set state of the key group) is displayed. If other drive types are selected, a "-" (hyphen) is displayed.
|
External RAID Group List
The External RAID Group list is displayed only when all of the conditions described below are satisfied.
The Non-disruptive Storage Migration License is registered
The "Enable" checkbox in the "Use External Drive" field is selected
| Item | Description |
|---|---|
Checkbox to select External RAID Groups |
Select the checkbox for the External RAID Group to create volumes. One External Volume is created in one External RAID Group. If multiple External RAID Groups are selected to create volumes, the number of External Volumes that are created is equal to the number of External RAID Groups. Select the checkbox to the left of "RAID Group Name" to select all External RAID Groups. [The maximum number of External Volumes that can be created for each model]
Note
|
RAID Group Name |
The External RAID Group name is displayed. |
Usage |
The usage of the External RAID Group is displayed.
|
External LU Information |
Whether the External RAID Group inherits the External LU Information is displayed. For External RAID Groups that are created from External Drives that inherit the External LU Information, "Inherited" is displayed. For External RAID Groups that are created from External Drives that do not inherit the External LU Information, a "-" (hyphen) is displayed. |
Total Capacity |
The total capacity of the External RAID Groups is displayed. |
Manual Setting (When Creating TPVs, NAS User Volumes, or Deduplication/Compression Volumes)
| Item | Description | Setting values |
|---|---|---|
Start of Suffix |
Select the suffix starting number to be added to the name of volumes that are to be created. This item must be set if the default value "0" is changed. If "0" or "1" is specified for "Number of Volumes", "Start of Suffix" cannot be selected. This item is not displayed when "NAS Volume" is selected for "Type". |
0 (Default) - 99999 |
Digits of Suffix |
Select the number of digits to be added to the name of volumes that are to be created. This item must be set if the default value "1" is changed. If "0" or "1" is specified for "Number of Volumes", "Digits of Suffix" cannot be selected. This item is not displayed when "NAS Volume" is selected for "Type". |
For the ETERNUS DX60 S5/DX100 S5/DX200 S5 and ETERNUS AF150 S3/AF250 S3: 1 (Default) - 4 For the other models: 1 (Default) - 5 |
Volume No. |
When specifying the volume number for a new volume, select the "Set Value" checkbox and input the volume number. Caution
|
"Set Value" checkbox Selected Cleared Volume No. Numeric characters (decimal) The following volume numbers can be used for each model: ETERNUS DX60 S5: 0 (Default) - 1023 ETERNUS DX100 S5: 0 (Default) - 4095 ETERNUS DX200 S5: 0 (Default) - 8191 ETERNUS DX500 S5/DX600 S5: 0 (Default) - 16383 ETERNUS DX900 S5: 0 (Default) - 65534 ETERNUS DX8100 S4: 0 (Default) - 16383 ETERNUS DX8900 S4: 0 (Default) - 65534 ETERNUS AF150 S3: 0 (Default) - 4095 ETERNUS AF250 S3: 0 (Default) - 8191 ETERNUS AF650 S3: 0 (Default) - 16383 |
TPP List
| Item | Description | Setting values |
|---|---|---|
Thin Provisioning Pool Name |
The TPP name is displayed. |
|
Drive Type |
The type of drive that configures the TPP is displayed. If multiple drive types are used in the TPP, the drive type is displayed as described below.
|
|
RAID Level |
The RAID level is displayed. High Performance (RAID1+0) High Capacity (RAID5) High Reliability (RAID6) High Reliability (RAID6-FR) Mirroring (RAID1) Striping (RAID0) |
|
Number of Volumes |
Specify the number of volumes to be created in each TPP. If "Enable" is selected for "Deduplication" or "Compression", the number of volumes can be specified only for TPPs that have the Deduplication/Compression setting enabled. For details on the maximum number of volumes for each model, refer to [The maximum number of volumes that can be created for each model]. Note
|
ETERNUS DX60 S5: 1 - 1024 ETERNUS DX100 S5: 1 - 4096 ETERNUS DX200 S5: 1 - 8192 ETERNUS DX500 S5/DX600 S5: 1 - 16384 ETERNUS DX900 S5: 1 - 1024 ETERNUS DX8100 S4: 1 - 16384 ETERNUS DX8900 S4: 1 - 1024 ETERNUS AF150 S3: 1 - 4096 ETERNUS AF250 S3: 1 - 8192 ETERNUS AF650 S3: 1 - 16384 0 (Default) |
Total Capacity |
The total capacity of the TPP is displayed. |
|
Total Free Space |
The total capacity of free space in the TPP is displayed. "Free space" means an area in the TPP where no volume is allocated, and dispersed areas which became free by creating and deleting a volume. |
|
Encryption |
The TPP encryption status is displayed.
|
|
Deduplication |
The Deduplication status (whether the setting is enabled and the state of the Deduplication) for the TPP is displayed.
This item is displayed only when Deduplication/Compression for the storage system is enabled. This item is not displayed when NAS user volumes are created. |
|
Compression |
The Compression status (whether the setting is enabled and the state of the Compression) for the TPP is displayed.
This item is displayed only when Deduplication/Compression for the storage system is enabled. This item is not displayed when NAS user volumes are created. |
Manual Setting (When Creating WSVs)
WSVs are created by concatenating volumes that are the same size in multiple RAID groups. Input the volume information for WSVs and the selection information for RAID groups, and specify the RAID groups that are to be concatenated.
RAID group capacity expansion for RAID groups which configure WSVs is not available (LDE cannot be performed).
Volume Information
In this screen, select the basic information for WSVs.
| Item | Description | Setting values | |||
|---|---|---|---|---|---|
Use all Largest Free Space |
Select the "Enable" checkbox to create the specified number of WSVs with the largest available free space in the selected RAID group. WSVs are created by concatenating spaces with the same capacity in multiple RAID groups. If the "Enable" checkbox is selected, the specified number of WSVs in the "Number of Volumes" field are created using the smallest "Largest Free Space" value in the concatenated RAID groups. Caution
|
"Enable" checkbox Selected Cleared |
|||
Number of Volumes |
Specify the number of volumes to be created. Note that "1" is displayed when "Manual" is selected for "Concatenation Order". In this case, the number of volumes cannot be specified. For details on the maximum number of volumes for each model, refer to [The maximum number of volumes that can be created for each model]. Caution
|
1 - 128 0 (Default) |
|||
Start of Suffix |
Select the suffix starting number to be added to the name of volumes that are to be created. This item must be set if the default value "0" is changed. If "0" or "1" is specified for "Number of Volumes", "Start of Suffix" cannot be selected. This item is displayed when "Automatic" is selected for "Concatenation Order". |
0 (Default) - 99999 |
|||
Digits of Suffix |
Select the number of digits to be added to the name of volumes that are to be created. This item must be set if the default value "1" is changed. If "0" or "1" is specified for "Number of Volumes", "Digits of Suffix" cannot be selected. This item is displayed when "Automatic" is selected for "Concatenation Order". |
For the ETERNUS DX60 S5/DX100 S5/DX200 S5 and ETERNUS AF150 S3/AF250 S3: 1 (Default) - 4 For the other models: 1 (Default) - 5 |
|||
Volume No. |
When specifying the volume number for a new volume, select the "Set Value" checkbox and input the volume number. Caution
|
"Set Value" checkbox Selected Cleared Volume No. Numeric characters (decimal) The following volume numbers can be used for each model: ETERNUS DX60 S5: 0 (Default) - 1023 ETERNUS DX100 S5: 0 (Default) - 4095 ETERNUS DX200 S5: 0 (Default) - 8191 ETERNUS DX500 S5/DX600 S5: 0 (Default) - 16383 ETERNUS DX900 S5: 0 (Default) - 65534 ETERNUS DX8100 S4: 0 (Default) - 16383 ETERNUS DX8900 S4: 0 (Default) - 65534 ETERNUS AF150 S3: 0 (Default) - 4095 ETERNUS AF250 S3: 0 (Default) - 8191 ETERNUS AF650 S3: 0 (Default) - 16383 |
|||
Wide Stripe Size |
Select the Wide Stripe Size ("Normal" or "Small") for the volumes. "Wide Stripe Size" is the size of the WSV Unit that is allocated to each RAID group in series. It is not necessary to change the default value (Normal) for normal use.
Caution
|
Normal (Default) Small |
|||
Concatenation Order |
Select the concatenation order of RAID groups from "Automatic" or "Manual". It is not necessary to change the default value (Automatic) for normal use.
|
Automatic (Default) Manual |
|||
Encryption by CM |
Select whether to encrypt (On) or not encrypt (Off) the new volumes. When the encryption mode is disabled, "On" cannot be selected. For the ETERNUS DX60 S5, this item is not displayed. Caution
|
On Off |
Select RAID Group Information
Input the selection information for RAID groups that are to be concatenated. WSVs are created by concatenating free areas that are the same size in multiple RAID groups with the same conditions.
| Item | Description | Setting values |
|---|---|---|
Drive Type |
Select the type of drive that configures a RAID group. The installed drive determines the selectable drive types that are displayed. If there are no RAID groups in which volumes can be created, the field is blank. Note
|
Online Nearline SSD Online/Nearline Online SED Nearline SED SSD SED Online SED/Nearline SED Blank |
RAID Level |
Select the RAID level. If there are no RAID groups in which volumes can be created, the field is blank. |
High Performance (RAID1+0) High Capacity (RAID5) High Reliability (RAID6) Reliability (RAID5+0) Mirroring (RAID1) Striping (RAID0) Blank |
Number of Member Drives |
Select the number of member drives in the RAID group. The selectable number of member drives, which is determined by the specified RAID level, is displayed. If there are no RAID groups in which volumes can be created, the field is blank. |
High Performance (RAID1+0): 4, 6, 8, 10, 12, 14, 16, 18, 20, 22, 24, 26, 28, 30, 32 High Capacity (RAID5): 3 - 16 High Reliability (RAID6): 5 - 16 Reliability (RAID5+0): 6, 8, 10, 12, 14, 16, 18, 20, 22, 24, 26, 28, 30, 32 Mirroring (RAID1): 2 Striping (RAID0): 2 - 16 |
Stripe Depth |
Select the Stripe Depth of the RAID group. The selectable Stripe Depth varies depending on the specified RAID level. Refer to "Available Stripe Depth Value" for details. If "Mirroring (RAID1)" is selected as the RAID level, a "-" (hyphen) is displayed. If there are no RAID groups in which volumes can be created, the field is blank. |
64 KB (Default) 128 KB 256 KB 512 KB 1024 KB "-" (hyphen) Blank |
Number of Concatenation RAID Groups |
The number of RAID groups that are to be concatenated is displayed. Click the [Select RAID Groups] button to add or delete RAID groups. The "Number of Concatenation RAID Groups" value is changed. This field is blank when no RAID groups are selected. |
Function Button
| Button | Description |
|---|---|
[Select RAID Groups] |
Click this item to display the [Select RAID Groups] Screen. Select the RAID groups that are to be concatenated in the [Select RAID Groups] screen. |
Function Link
| Item | Description |
|---|---|
Setting Concatenation Order |
Click this item to display the [Setting Concatenation Order] Screen. Change the concatenation order of the RAID groups in the [Setting Concatenation Order] screen. This link is not displayed when "Concatenation Order" is "Automatic". Select the RAID groups in the [Select RAID Groups] screen to change the concatenation order. |
Display Contents
Selected RAID Group List
A list of RAID groups that configure the WSV is displayed. When no RAID groups are selected, only the item name is displayed.
The RAID group list is displayed in concatenation order. Note that displayed items cannot be sorted by clicking the item name.
| Item | Description |
|---|---|
No. |
The RAID group number is displayed. |
RAID Group Name |
The RAID group name is displayed. |
Drive Type |
The type of drive that configures the RAID group is displayed. Online Nearline SSD Online SED Nearline SED SSD SED |
Total Capacity |
The total capacity of the RAID groups is displayed. |
Total Free Space |
The total capacity of free space in the RAID group is displayed. "Free space" means an area in the RAID group where no volume is created, and dispersed areas which became free by creating and deleting a volume. |
Largest Free Space |
The maximum capacity of free space in the RAID group is displayed. |
Encryption |
The encryption status (the set state of the key group) of the RAID group is displayed. This item is displayed only when "Online SED", "Nearline SED", "SSD SED", or "Online SED/Nearline SED" is selected for the "Select RAID Group Information" field. SED (Enabled Key Group) SED (Disabled Key Group) |
[Select RAID Groups] Screen
In this screen, select RAID groups that are to be concatenated. In the [Select RAID Groups] screen, a list of the RAID groups that satisfy the conditions (drive type, RAID level, number of member drives, and Stripe Depth) specified in the "Select RAID Group Information" field is displayed. Note that RAID groups in the following conditions are not displayed on the list:
RAID groups that belong to TPPs
RAID groups that belong to FTRPs
RAID groups that are registered as REC Disk Buffers
RAID groups that are registered as Extreme Cache Pools
RAID groups in which volumes other than Standard, WSV, SDV, or SDPV types are registered
RAID group which "Usage" is "Temporary"
When the drive type is "Online SED", "Nearline SED", "SSD SED", or "Online SED/Nearline SED", setting the same "Encryption" settings (the set state of the key group) is recommended for all of the RAID groups that configure the WSV.
| Item | Description |
|---|---|
Checkbox to select RAID groups |
Select the checkbox for the RAID group to be selected. |
No. |
The RAID group number is displayed. |
RAID Group Name |
The RAID group name is displayed. |
Drive Type |
The type of drive that configures the RAID group is displayed. If multiple drive types are used in the RAID group, the drive type is displayed as described below.
|
Total Capacity |
The total capacity of the RAID groups is displayed. |
Total Free Space |
The total capacity of free space in the RAID group is displayed. "Free space" means an area in the RAID group where no volume is created, and dispersed areas which became free by creating and deleting a volume. |
Largest Free Space |
The maximum capacity of free space in the RAID group is displayed. Caution
|
Encryption |
The encryption status (the set state of the key group) of the RAID group is displayed. This item is displayed only when "Online SED", "Nearline SED", "SSD SED", or "Online SED/Nearline SED" is selected for the "Select RAID Group Information" field.
|
[Setting Concatenation Order] Screen
In this screen, change the concatenation order of the RAID groups. For details on RAID group information, refer to the [Select RAID Groups] Screen.
| Item | Description |
|---|---|
|
Radio buttons to select a RAID group |
Select the RAID group to change (raise or drop) the concatenation order for. |
Function Button
| Button | Description |
|---|---|
[Up] |
Raises the concatenation order up by one for the RAID group that is selected with the radio button. If the RAID group is already on top of the list, the order cannot be changed. |
[Down] |
Drops the concatenation order down by one for the RAID group that is selected with the radio button. If the RAID group is already at the bottom of the list, the order cannot be changed. |
Naming Conventions for Creating Volumes
When creating multiple volumes at the same time, the volume name is automatically applied to the volumes according to the specified "Name", selected "Start of Suffix", and selected "Digits of Suffix".
(Example) When the specified volume name is "Volume" (six characters), "Start of Suffix" is "90", "Digits of Suffix" is "2", and the number of volumes is "11": the volume names "Volume90" to "Volume100" are applied to the volumes.
If the automatically applied volume name exceeds 32 characters due to the "Start of Suffix" and "Digits of Suffix" settings, the excess characters are deleted from the specified "Name", and replaced with a "~".
(Example) When the specified volume name is "ETERNUS_DXAF_Standard-XX_VolumeX" (32 characters), "Start of Suffix" is "90", "Digits of Suffix" is "2", and the number of volumes is "11": the volume names "ETERNUS_DXAF_Standard-XX_Volu~90" to "ETERNUS_DXAF_Standard-XX_Vol~100" are applied to the volumes.
When a volume name including the suffix number already exists, the suffix number is increased by one (+1). The suffix number is increased by one (+1) until no volume names overlap.
If "Start of Suffix" starts with "0" and it exceeds "Digits of Suffix", the zeros are deleted from "Start of Suffix" and then applied to the volume name.
(Example 1) When the specified volume name is "Volume", "Start of Suffix" is "000", and "Digits of Suffix" is "1": The volume name "Volume0" is applied to the volume.
(Example 2) When the specified volume name is "Volume", "Start of Suffix" is "00005", and "Digits of Suffix" is "2": The volume name "Volume05" is applied to the volume.
Operating Procedures
Creating Standard Type Volumes, SDVs, or SDPVs
Automatically Selecting Destinations to Create Standard Type Volumes, SDVs, or SDPVs
Click [Create] in [Action].
Select "Standard", "Snap Data Volume", or "Snap Data Pool Volume" for "Type".
Select "Automatic" for "RAID Group / TPP Selection".
Specify the volume detailed information, and click the [Create] button.
→ A confirmation screen appears.
CautionAn error screen appears in the following conditions:
The "Name" is not entered
The "Name" does not satisfy the input conditions
The "Capacity" is not entered
The "Capacity" does not satisfy the input conditions
The SDPV capacity that is specified for "Capacity" is not a multiple of the SDPE capacity (1 GB/2 GB/4 GB)
The number of volumes that is specified for "Number of Volumes" exceeds the maximum number of volumes that can be created
Free space in the RAID group is insufficient
Click the [OK] button.
→ Volume creation starts.
Click the [Done] button to return to the [Volume] screen.
Manually Selecting Destinations to Create Standard Type Volumes, SDVs, or SDPVs
Click [Create] in [Action].
Select "Standard", "Snap Data Volume", or "Snap Data Pool Volume" for "Type".
Select "Manual" for "RAID Group / TPP Selection".
NoteIf "Standard" is selected for "Type" and the "Enable" checkbox in the "Use External Drive" field is selected, "Manual" is automatically selected for "RAID Group / TPP Selection".
Specify the detailed information of new volumes and select the RAID group or External RAID Group in which the volumes are to be created. Click the [Create] button.
→ A confirmation screen appears.
NoteWhen specifying the "Volume No.", select the "Set Value" checkbox and input the number.
When using the maximum free space in the RAID group to create volumes without specifying the capacity, select the "Enable" checkbox for "Use all Largest Free Space", and then input the number of volumes. This setting is available for "Standard" and "SDPV" type volumes.
- The External RAID Group list is displayed only when all of the conditions described below are satisfied. Select External RAID Groups to create the volume.
"Standard" is selected for "Type"
The "Enable" checkbox in the "Use External Drive" field is selected
Select the checkbox to the left of "RAID Group Name" to select all External RAID Groups.
Caution- An error screen appears in the following conditions:
The "Name" is not entered
The "Name" does not satisfy the input conditions
The "Capacity" does not satisfy the input conditions
The SDPV capacity that is specified for "Capacity" is not a multiple of the SDPE capacity (1 GB/2 GB/4 GB)
The "Enable" checkbox for "Use all Largest Free Space" is cleared and "Capacity" is not entered
The "Enable" checkbox for "Use all Largest Free Space" is selected and the capacity of the created volume is 23 MB or less
The "Enable" checkbox for "Use all Largest Free Space" is selected and the capacity of the created volume is larger than the maximum capacity
The "Set Value" checkbox is selected and "Volume No." is not entered
The input value of "Volume No." exceeds the settable range
The specified "Volume No." is already used
"Volume No." is specified and total number of values that are specified for "Number of Volumes" is not "1"
The number of volumes that is specified for "Number of Volumes" exceeds the maximum number of volumes that can be created
Free space in the RAID group is insufficient
LDE is being performed in the RAID group to which the target volume belongs
The RAID group or the External RAID Group is blocked
The status of the RAID group is "Broken"
The status of the External RAID Group is other than "Available"
No External RAID Groups are selected (when "Use External Drive" is enabled)
Click the [OK] button.
→ Volume creation starts.
Click the [Done] button to return to the [Volume] screen.
Creating TPVs
If TPPs with different chunk sizes exist in the storage system, the entire maximum pool capacity that is specified in "Set Thin Provisioning" might not be usable to create TPVs. Refer to the [Set Thin Provisioning] function for details.
If the "Provisioned Capacity" (or the total logical capacity) of the created volumes in the TPP exceeds the total capacity of the creation destination TPP (or if the "Provisioned Rate" (or the capacity rate) exceeds "100 %"), a warning message appears in the result screen. Check the TPP used state and add drives to expand the TPP capacity as required. Check the [Thin Provisioning Pool Detail] screen for "Provisioned Rate". Refer to the [Thin Provisioning Pool (Basic Information)] function for details.
Automatically Selecting Destinations to Create TPVs
Click [Create] in [Action].
Select "Thin Provisioning Volume" for "Type".
Select "Automatic" for "RAID Group / TPP Selection".
Specify the volume detailed information, and click the [Create] button.
→ A confirmation screen appears.
CautionAn error screen appears in the following conditions:
The "Name" is not entered
The "Name" does not satisfy the input conditions
The "Capacity" is not entered
The "Capacity" does not satisfy the input conditions
The number of volumes that is specified for "Number of Volumes" exceeds the maximum number of volumes that can be created
Click the [OK] button.
→ Volume creation starts.
Click the [Done] button to return to the [Volume] screen.
Manually Selecting Destinations to Create TPVs
Click [Create] in [Action].
Select "Thin Provisioning Volume" for "Type".
Select "Manual" for "RAID Group / TPP Selection".
Specify the detailed information of new volumes and select the TPP in which the volumes are to be created. Click the [Create] button.
→ A confirmation screen appears.
NoteWhen specifying the "Volume No.", select the "Set Value" checkbox and input the number.
CautionThe "Encryption by CM" setting cannot be changed.
- An error screen appears in the following conditions:
The "Name" is not entered
The "Name" does not satisfy the input conditions
The "Capacity" does not satisfy the input conditions
The "Set Value" checkbox is selected and "Volume No." is not entered
The input value of "Volume No." exceeds the settable range
The specified "Volume No." is already used
"Volume No." is specified and total number of values that are specified for "Number of Volumes" is not "1"
The number of volumes that is specified for "Number of Volumes" exceeds the maximum number of volumes that can be created
RAID groups that configure a TPP are blocked
The status of RAID groups that configure a TPP is "Broken"
Click the [OK] button.
→ Volume creation starts.
Click the [Done] button to return to the [Volume] screen.
Creating WSVs
Click [Create] in [Action].
Select "Wide Striping Volume" for "Type".
Input the detailed information of the volumes that are to be created, specify the selection information of the RAID group, and then click the [Select RAID Groups] button.
→ The [Select RAID Groups] Screen appears.
NoteWhen specifying the "Volume No.", select the "Set Value" checkbox and input the number.
When using the maximum free space in the selected RAID groups to create WSVs without specifying the capacity, select the "Enable" checkbox for "Use all Largest Free Space", and then input the number of WSVs.
Select the RAID group that is to be concatenated (multiple selections can be made) and click the [OK] button.
→ The display returns to the initial screen.
After selecting RAID groups is complete, click the [Create] button.
→ A confirmation screen appears.
Caution- An error screen appears in the following conditions:
The "Name" is not entered
The "Name" does not satisfy the input conditions
The "Capacity" does not satisfy the input conditions
The "Enable" checkbox for "Use all Largest Free Space" is cleared and "Capacity" is not entered
The "Enable" checkbox for "Use all Largest Free Space" is selected and the capacity of the created WSV is 23 MB or less
The "Enable" checkbox for "Use all Largest Free Space" is selected and the capacity of the created WSV is larger than the maximum capacity
The "Set Value" checkbox is selected and "Volume No." is not entered
The input value of "Volume No." exceeds the settable range
"Volume No." is specified and "Number of Volumes" is not "1"
The "Number of Concatenation RAID Groups" field is left blank, "1" is specified, or a value that is "65" or more is specified
The maximum free space in the selected RAID group is smaller than the volume size that is to be concatenated
LDE is being performed in the RAID group to which the target volume belongs
The RAID group is blocked
The status of the RAID group is "Broken"
NoteTo change the concatenation order of the RAID groups, select "Manual" for "Concatenation Order" in the Volume Information field. Click the [Concatenation Order] link to display the [Setting Concatenation Order] Screen. The concatenation order of the RAID groups can be changed in the [Setting Concatenation Order] screen.
- An error screen appears in the following conditions:
Click the [OK] button.
→ Volume creation starts.
Click the [Done] button to return to the [Volume] screen.
Creating NAS User Volumes
If the "Provisioned Capacity" (or the total logical capacity) of the created volumes in the TPP exceeds the total capacity of the creation destination TPP (or if the "Provisioned Rate" (or the capacity rate) exceeds "100 %"), a warning message appears in the result screen. Check the TPP used state and add drives to expand the TPP capacity as required. Check the [Thin Provisioning Pool Detail] screen for "Provisioned Rate". Refer to the [Thin Provisioning Pool (Basic Information)] function for details.
Automatically Selecting Destinations to Create NAS User Volumes
Click [Create] in [Action].
Select "NAS Volume" for "Type".
Select "Automatic" for "RAID Group / TPP Selection".
Specify the volume detailed information, and click the [Create] button.
→ A confirmation screen appears.
Caution- An error screen appears in the following conditions:
The "Name" is not entered
The "Name" does not satisfy the input conditions
The "Capacity" is not entered
The "Capacity" does not satisfy the input conditions
- An error screen appears in the following conditions:
Click the [OK] button.
→ Volume creation starts.
Click the [Done] button to return to the [Volume] screen.
CautionIf the NAS user volume creation fails, refer to "Procedures for when the NAS user volume creation is not completed successfully".
Manually Selecting Destinations to Create NAS User Volumes
Click [Create] in [Action].
Select "NAS Volume" for "Type".
Select "Manual" for "RAID Group / TPP Selection".
Specify the detailed information of new volumes and select the TPP in which the volumes are to be created. Click the [Create] button.
→ A confirmation screen appears.
NoteWhen specifying the "Volume No.", select the "Set Value" checkbox and input the number.
CautionThe "Encryption by CM" setting cannot be changed.
- An error screen appears in the following conditions:
The "Name" is not entered
The "Name" does not satisfy the input conditions
The "Capacity" does not satisfy the input conditions
The "Set Value" checkbox is selected and "Volume No." is not entered
The input value of "Volume No." exceeds the settable range
The specified "Volume No." is already used
RAID groups that configure a TPP are blocked
The status of RAID groups that configure a TPP is "Broken"
Click the [OK] button.
→ Volume creation starts.
Click the [Done] button to return to the [Volume] screen.
CautionIf the NAS user volume creation fails, refer to "Procedures for when the NAS user volume creation is not completed successfully".
Creating Deduplication/Compression Volumes
Automatically Selecting Destinations to Create Deduplication/Compression Volumes
Click [Create] in [Action].
Select "Thin Provisioning Volume" for "Type" and set "Enable" for "Deduplication", "Compression", or both "Deduplication" and "Compression".
Select "Automatic" for "RAID Group / TPP Selection".
Specify the volume detailed information, and click the [Create] button.
→ A confirmation screen appears.
Caution- An error screen appears in the following conditions:
The "Name" is not entered
The "Name" does not satisfy the input conditions
The "Capacity" is not entered
The "Capacity" does not satisfy the input conditions
The number of volumes that is specified for "Number of Volumes" exceeds the maximum number of volumes that can be created
The Deduplication status of the TPP where volumes are to be created is "Disable", "Error", or a "-" (hyphen)
The Compression status of the TPP where volumes are to be created is "Disable", "Error", or a "-" (hyphen)
- An error screen appears in the following conditions:
Click the [OK] button.
→ Volume creation starts.
Click the [Done] button to return to the [Volume] screen.
Manually Selecting Destinations to Create Deduplication/Compression Volumes
Click [Create] in [Action].
Select "Thin Provisioning Volume" for "Type" and set "Enable" for "Deduplication", "Compression", or both "Deduplication" and "Compression".
Select "Manual" for "RAID Group / TPP Selection".
Specify the detailed information of new volumes and select the TPP in which the volumes are to be created. Click the [Create] button.
→ A confirmation screen appears.
NoteWhen specifying the "Volume No.", select the "Set Value" checkbox and input the number.
CautionThe "Encryption by CM" setting cannot be changed.
- An error screen appears in the following conditions:
The "Name" is not entered
The "Name" does not satisfy the input conditions
The "Capacity" does not satisfy the input conditions
The "Set Value" checkbox is selected and "Volume No." is not entered
The input value of "Volume No." exceeds the settable range
The specified "Volume No." is already used
"Volume No." is specified and total number of values that are specified for "Number of Volumes" is not "1"
The number of volumes that is specified for "Number of Volumes" exceeds the maximum number of volumes that can be created
The Deduplication status of the selected TPP is "Disable", "Error", or a "-" (hyphen)
The Compression status of the selected TPP is "Disable", "Error", or a "-" (hyphen)
RAID groups that configure a TPP are blocked
The status of RAID groups that configure a TPP is "Broken"
Click the [OK] button.
→ Volume creation starts.
Click the [Done] button to return to the [Volume] screen.