


Assign REC Disk Buffer
Overview
This function assigns an REC Disk Buffer to an REC Buffer. This function also deletes the assignment of the REC Disk Buffers.
Requirements for REC Buffers to Assign REC Disk Buffers
The usage of the REC Buffer must be "Send"
- The number of REC Disk Buffers that are to be assigned to a single REC Buffer must be one of the following numbers.
For the ETERNUS DX100 S5/DX200 S5: One or two (but less than or equal to the number of CMs that are installed)
For the ETERNUS DX500 S5/DX600 S5: One or two
For the ETERNUS DX900 S5: One, two, or four (but less than or equal to the number of CMs that are installed)
For the ETERNUS DX8900 S4: One, two, four, or six (but less than or equal to the number of CMs that are installed)
For the ETERNUS AF150 S3/AF250 S3: One or two
For the ETERNUS AF650 S3: One or two
- Requirements to assign multiple REC Disk Buffers to a single REC Buffer
The drive type (Online/Nearline/SSD/Online SED/Nearline SED/SSD SED) must be the same (*1)
The assigned REC Disk Buffers have the same number of drives (two, four, or eight)
The assigned REC Disk Buffers have the same encryption status ("CM", "-", or "SED")
- Recommended conditions for assigning multiple REC Disk Buffers to a single REC Buffer
The assigned REC Disk Buffers have the same Stripe Depth (*2)
The assigned REC Disk Buffers have the same capacity (*3)
The SSD type (SSD-H/SSD-M/SSD-L/SSD-H SED/SSD-M SED/SSD-L SED) must be the same
*1 : Only assigning either "Online" or "Nearline" REC Disk Buffers is recommended. Also, only assigning either an "Online SED" or a "Nearline SED" REC Disk Buffers is recommended. This is because the available capacity and the access performance may be reduced when these REC Disk Buffers are assigned in the same REC Buffer. *2 : If the Stripe Depth is different for the used REC Disk Buffers, access performance of the REC Disk Buffer may be affected. *3 : When using REC Disk Buffers of different capacities, the smallest becomes the standard, and all other REC Disk Buffers are regarded as having the same capacity as the smallest REC Disk Buffer. In this case, the remaining REC Disk Buffer space will NOT be used.
This function can only be used when the local storage system (the storage system that assigns REC Disk Buffers) supports REC.
A single REC Disk Buffer cannot be assigned to multiple REC Buffers.
When an REC that uses an REC Buffer is being performed, make sure to suspend the relevant REC session in advance.
When assigning REC Disk Buffers to REC Buffers, an REC Disk Buffer must be created in advance. Refer to the [Create REC Disk Buffer] function for details.
The Stripe Depth for REC Disk Buffers can be checked from the [REC Disk Buffer Detail] screen. Refer to the [REC Disk Buffer] function for details.
User Privileges
Availability of Executions in the Default Role
| Default role | Availability of executions |
|---|---|
| Monitor | |
| Admin | |
| StorageAdmin | |
| AccountAdmin | |
| SecurityAdmin | |
| Maintainer |
Refer to "User Roles and Policies" for details on the policies and roles.
Display Contents
The selected REC Buffer and the REC Disk Buffers, which will be/are assigned to the REC Buffer, are displayed.
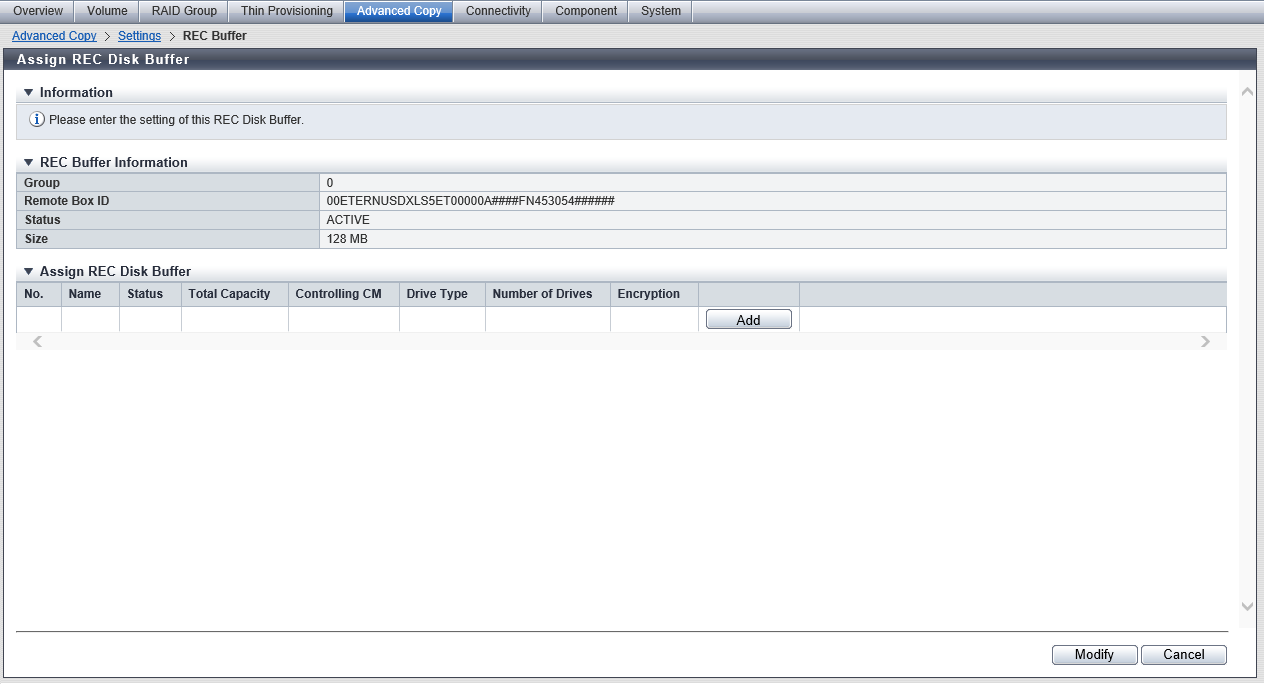
REC Buffer Information
| Item | Description |
|---|---|
|
Group |
The management group number of the REC Buffer to which the REC Disk Buffer is to be assigned is displayed. ETERNUS DX100 S5: 0 ETERNUS DX200 S5: 0 - 3 ETERNUS DX500 S5/DX600 S5/DX900 S5: 0 - 7 ETERNUS DX8100 S4/DX8900 S4: 0 - 7 ETERNUS AF150 S3: 0 ETERNUS AF250 S3: 0 - 3 ETERNUS AF650 S3: 0 - 7 |
|
Remote Box ID |
The remote storage system Box ID of the REC Buffer to which the REC Disk Buffer is to be assigned is displayed. If the remote storage system path information has been deleted, "???" is displayed. |
|
Status |
The status of the REC Buffer to which the REC Disk Buffer is to be assigned is displayed.
|
|
Size |
The capacity of the REC Buffer to which the REC Disk Buffer is to be assigned is displayed. ETERNUS DX100 S5: 128 MB ETERNUS DX200 S5: 128 MB, 256 MB, 512 MB ETERNUS DX500 S5/DX600 S5/DX900 S5: 128 MB, 256 MB, 512 MB, 1024 MB, 2048 MB ETERNUS DX8100 S4/DX8900 S4: 128 MB, 256 MB, 512 MB, 1024 MB, 2048 MB ETERNUS AF150 S3: 128 MB ETERNUS AF250 S3: 128 MB, 256 MB, 512 MB ETERNUS AF650 S3: 128 MB, 256 MB, 512 MB, 1024 MB, 2048 MB |
Assign REC Disk Buffer
| Item | Description |
|---|---|
|
No. |
The RAID group number of the REC Disk Buffer is displayed. |
|
Name |
The RAID group name of the REC Disk Buffer is displayed. |
|
Status |
The RAID group status of the REC Disk Buffer is displayed. Refer to "RAID Group Status" for details. |
|
Total Capacity |
The total capacity of the REC Disk Buffer is displayed. |
|
Controlling CM |
The Controlling CM of the RAID group which have been registered as the REC Disk Buffer is displayed. For the ETERNUS DX900 S5 or the ETERNUS DX8900 S4 CE#x CM#y For the other models CM#y x: CE number y: CM number |
|
Drive Type |
The drive type of the REC Disk Buffer is displayed. If multiple drive types are used in the REC Disk Buffer, the drive type is displayed as described below.
|
|
Number of Drives |
The number of drives, which configure the REC Disk Buffer, is displayed. 2 4 8 |
|
Encryption |
The encryption status of the REC Disk Buffer is displayed. CM: Encryption by CM "-" (hyphen): Unencryption SED: Encryption by SED |
Function Button
| Button | Description |
|---|---|
[Add] |
Assigns an additional REC Disk Buffer. The [Add] button is available when the number of assigned REC Disk Buffers is one of the following numbers and the REC Disk Buffers that are to be assigned satisfy the required conditions. ETERNUS DX100 S5/DX200 S5, ETERNUS DX500 S5/DX600 S5, and ETERNUS AF150 S3/AF250 S3/AF650 S3: 0 or 1 (less than the number of installed CMs) ETERNUS DX900 S5: 0 - 3 (less than the number of installed CMs) ETERNUS DX8900 S4: 0 - 5 (less than the number of installed CMs) |
[Delete] |
Deletes the assignment of the specified REC Disk Buffers. If no REC Disk Buffer is assigned, the [Delete] button is not displayed. |
Settings
In this screen, select the REC Disk Buffer that is to be assigned to the REC Buffer.
[Select REC Disk Buffer] Screen
Select REC Disk Buffer
For other items that are not described in this section, refer to "Assign REC Disk Buffer".
| Item | Description |
|---|---|
|
Checkbox to select an REC Disk Buffer |
Select the checkbox for the REC Disk Buffer that is to be assigned to the REC Buffer. For details on the requirements for REC Disk Buffer selection, refer to "Requirements for REC Buffers to Assign REC Disk Buffers". Note
|
Operating Procedures
Assigning an additional REC Disk Buffer
In this screen, assign an additional REC Disk Buffer.
Select the REC Buffer, to which the REC Disk Buffer is to be assigned, and click [Assign REC Disk Buffer] in [Action].
Click the [Add] button.
→ The [Select REC Disk Buffer] screen appears.
Select the checkbox for the additional REC Disk Buffer (multiple selections can be made) that is to be assigned, and click the [OK] button.
→ The selected REC Disk Buffer is added.
CautionWhen assigning multiple REC Disk Buffers to an REC Buffer, select ones with the same capacity.
- An error screen appears in the following conditions:
No REC Disk Buffers, which satisfy the assignment requirements, are registered to the storage system
The number of REC Disk Buffers, which are assigned to an REC Buffer, exceeds the maximum number which the storage system model supports
The selected REC Disk Buffer does not satisfy the assignment requirements
NoteTo delete the assignment of the REC Disk Buffer, click the [Delete] button for the target REC Disk Buffer (RAID group).
When the REC Disk Buffer assignment has been completed, click the [Modify] button.
→ A confirmation screen appears.
Click the [OK] button.
→ The REC Disk Buffer assignment starts.
Click the [Done] button to return to the [REC Buffer] screen.
Deleting an REC Disk Buffer assignment
In this screen, delete the assignment of the REC Disk Buffers from the REC Buffer.
Select the REC Buffer to delete the assignment of the REC Disk Buffer, and click [Assign REC Disk Buffer] in [Action].
To delete the assignment of the REC Disk Buffer, click the [Delete] button for the target REC Disk Buffer (RAID group).
→ The selected REC Disk Buffer is deleted from the list.
Click the [Modify] button.
→ A confirmation screen appears.
Click the [OK] button.
→ Deletion of an REC Disk Buffer starts.
Click the [Done] button to return to the [REC Buffer] screen.