


Change Controlling CM
Overview
This function changes the Controlling CM that is allocated to the RAID group.
Unequal loading between the CMs can be resolved by changing the Controlling CM.
The work I/O performance of the entire storage system is lowered because the storage system status is changed to Write Through mode while the Controlling CM is being changed. Therefore, it is recommended to change the Controlling CM when work I/O is low. It may take up to several tens of minutes for changing the Controlling CM.
- This function cannot be used under the following conditions:
A CE that is in a state other than "Normal" and "Undefined" exists
A CM that is in a state other than "Normal" and "Warning" exists
A BBU (BTU/BCU) that is in a state other than "Normal" exists
Formatting is being performed in the volumes that are registered in the target RAID group
Encryption is being performed in the target RAID group
The target RAID group status is not "Available"
The rebuild, copyback, or redundancy copy is being performed in the target RAID group
If the target RAID group belongs to the TPPs where Deduplication, Compression, or both are enabled, the status of the Data Container Volume in the relevant TPP is "Readying", "Not Available", "Not Ready", "Broken", or "Data Lost"
The cache mode of the storage system is "Write Through Mode"
LDE is being performed in the storage system
LUN Concatenation is being performed in the storage system
The RAID migration is being performed in the storage system
The RAID group diagnosis is being performed in the storage system
The disk diagnosis is being performed in the storage system
The TPV balancing is being performed in the storage system
The FTRP balancing is being performed in the storage system
Pinned data exists in the storage system
The Controlling CM can be changed for RAID groups that configure TPPs.
User Privileges
Availability of Executions in the Default Role
| Default role | Availability of executions |
|---|---|
| Monitor | |
| Admin | |
| StorageAdmin | |
| AccountAdmin | |
| SecurityAdmin | |
| Maintainer |
Refer to "User Roles and Policies" for details on the policies and roles.
Settings
In this screen, select the Controlling CM of the RAID group.
Change Controlling CM Setting
| Item | Description | Setting values |
|---|---|---|
New Controlling CM |
Select the new Controlling CM. "Automatic" and the normal CM number ("CE#x CM#y" or "CM#y") that is installed are displayed as options. Select "Automatic" for normal operations. When "Automatic" is selected, the Controlling CM that is to be allocated is determined by the RAID group number. Refer to "Automatic Controlling CM Setting" for details. |
For the ETERNUS DX900 S5 or the ETERNUS DX8900 S4 Automatic CE#x CM#y For the other models Automatic CM#y x: CE number y: CM number |
Automatic Controlling CM Setting
The Controlling CM is determined by the value of the remainder when the RAID group number is divided by the number of controllers. If CMs are not installed or if a failed CM exists, the controlling CM is assigned to balance the load in the normal CMs.
When Using Storage Systems Other than the ETERNUS DX900 S5 or the ETERNUS DX8900 S4, and All the CMs Are Installed in a Normal State:
| Remainder when dividing the RAID group number by the number of CMs (2) | Controlling CM assignment |
|---|---|
| 0 | CM#0 |
| 1 | CM#1 |
When Using the ETERNUS DX900 S5 or the ETERNUS DX8900 S4, and All the CMs Are Installed in a Normal State:
| Remainder when dividing the RAID group number by the number of CMs | Number of CMs (Number of CEs) | |||||||||||
|---|---|---|---|---|---|---|---|---|---|---|---|---|
| 2 (1CE) | 4 (2CE) | 6 (3CE) | 8 (4CE) | 10 (5CE) | 12 (6CE) | 14 (7CE) | 16 (8CE) | 18 (9CE) | 20 (10CE) | 22 (11CE) | 24 (12CE) | |
| 0 | CE#0 CM#0 | CE#0 CM#0 | CE#0 CM#0 | CE#0 CM#0 | CE#0 CM#0 | CE#0 CM#0 | CE#0 CM#0 | CE#0 CM#0 | CE#0 CM#0 | CE#0 CM#0 | CE#0 CM#0 | CE#0 CM#0 |
| 1 | CE#0 CM#1 | CE#1 CM#1 | CE#2 CM#1 | CE#3 CM#1 | CE#4 CM#1 | CE#5 CM#1 | CE#6 CM#1 | CE#7 CM#1 | CE#8 CM#1 | CE#9 CM#1 | CE#A CM#1 | CE#B CM#1 |
| 2 | - | CE#1 CM#0 | CE#1 CM#0 | CE#1 CM#0 | CE#1 CM#0 | CE#1 CM#0 | CE#1 CM#0 | CE#1 CM#0 | CE#1 CM#0 | CE#1 CM#0 | CE#1 CM#0 | CE#1 CM#0 |
| 3 | - | CE#0 CM#1 | CE#1 CM#1 | CE#2 CM#1 | CE#3 CM#1 | CE#4 CM#1 | CE#5 CM#1 | CE#6 CM#1 | CE#7 CM#1 | CE#8 CM#1 | CE#9 CM#1 | CE#A CM#1 |
| 4 | - | - | CE#2 CM#0 | CE#2 CM#0 | CE#2 CM#0 | CE#2 CM#0 | CE#2 CM#0 | CE#2 CM#0 | CE#2 CM#0 | CE#2 CM#0 | CE#2 CM#0 | CE#2 CM#0 |
| 5 | - | - | CE#0 CM#1 | CE#1 CM#1 | CE#2 CM#1 | CE#3 CM#1 | CE#4 CM#1 | CE#5 CM#1 | CE#6 CM#1 | CE#7 CM#1 | CE#8 CM#1 | CE#9 CM#1 |
| 6 | - | - | - | CE#3 CM#0 | CE#3 CM#0 | CE#3 CM#0 | CE#3 CM#0 | CE#3 CM#0 | CE#3 CM#0 | CE#3 CM#0 | CE#3 CM#0 | CE#3 CM#0 |
| 7 | - | - | - | CE#0 CM#1 | CE#1 CM#1 | CE#2 CM#1 | CE#3 CM#1 | CE#4 CM#1 | CE#5 CM#1 | CE#6 CM#1 | CE#7 CM#1 | CE#8 CM#1 |
| 8 | - | - | - | - | CE#4 CM#0 | CE#4 CM#0 | CE#4 CM#0 | CE#4 CM#0 | CE#4 CM#0 | CE#4 CM#0 | CE#4 CM#0 | CE#4 CM#0 |
| 9 | - | - | - | - | CE#0 CM#1 | CE#1 CM#1 | CE#2 CM#1 | CE#3 CM#1 | CE#4 CM#1 | CE#5 CM#1 | CE#6 CM#1 | CE#7 CM#1 |
| 10 | - | - | - | - | - | CE#5 CM#0 | CE#5 CM#0 | CE#5 CM#0 | CE#5 CM#0 | CE#5 CM#0 | CE#5 CM#0 | CE#5 CM#0 |
| 11 | - | - | - | - | - | CE#0 CM#1 | CE#1 CM#1 | CE#2 CM#1 | CE#3 CM#1 | CE#4 CM#1 | CE#5 CM#1 | CE#6 CM#1 |
| 12 | - | - | - | - | - | - | CE#6 CM#0 | CE#6 CM#0 | CE#6 CM#0 | CE#6 CM#0 | CE#6 CM#0 | CE#6 CM#0 |
| 13 | - | - | - | - | - | - | CE#0 CM#1 | CE#1 CM#1 | CE#2 CM#1 | CE#3 CM#1 | CE#4 CM#1 | CE#5 CM#1 |
| 14 | - | - | - | - | - | - | - | CE#7 CM#0 | CE#7 CM#0 | CE#7 CM#0 | CE#7 CM#0 | CE#7 CM#0 |
| 15 | - | - | - | - | - | - | - | CE#0 CM#1 | CE#1 CM#1 | CE#2 CM#1 | CE#3 CM#1 | CE#4 CM#1 |
| 16 | - | - | - | - | - | - | - | - | CE#8 CM#0 | CE#8 CM#0 | CE#8 CM#0 | CE#8 CM#0 |
| 17 | - | - | - | - | - | - | - | - | CE#0 CM#1 | CE#1 CM#1 | CE#2 CM#1 | CE#3 CM#1 |
| 18 | - | - | - | - | - | - | - | - | - | CE#9 CM#0 | CE#9 CM#0 | CE#9 CM#0 |
| 19 | - | - | - | - | - | - | - | - | - | CE#0 CM#1 | CE#1 CM#1 | CE#2 CM#1 |
| 20 | - | - | - | - | - | - | - | - | - | - | CE#A CM#0 | CE#A CM#0 |
| 21 | - | - | - | - | - | - | - | - | - | - | CE#0 CM#1 | CE#1 CM#1 |
| 22 | - | - | - | - | - | - | - | - | - | - | - | CE#B CM#0 |
| 23 | - | - | - | - | - | - | - | - | - | - | - | CE#0 CM#1 |
Display Contents
The information of the selected RAID group is displayed.
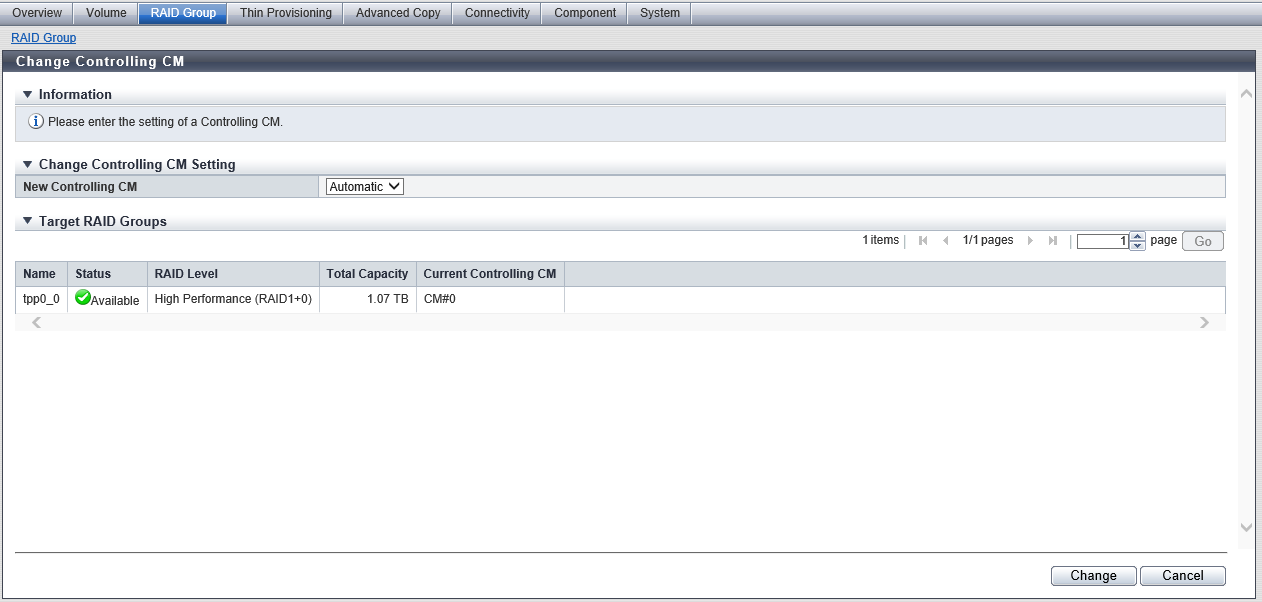
Target RAID Groups
| Item | Description |
|---|---|
|
Name |
The RAID group name is displayed. |
|
Status |
The RAID group status is displayed. Refer to "RAID Group Status" for details. |
|
RAID Level |
The RAID level is displayed. High Performance (RAID1+0) High Capacity (RAID5) High Reliability (RAID6) High Reliability (RAID6-FR) Reliability (RAID5+0) Mirroring (RAID1) Striping (RAID0) |
|
Total Capacity |
The total capacity of the RAID groups is displayed. |
|
Current Controlling CM |
The current Controlling CM of the RAID group are displayed. For the ETERNUS DX900 S5 or the ETERNUS DX8900 S4 CE#x CM#y For the other models CM#y x: CE number y: CM number |
Operating Procedures
Select the RAID group to change the Controlling CM (multiple selections can be made) and click [Change Controlling CM] in [Action].
Caution- [Change Controlling CM] cannot be clicked if a RAID group whose "Usage" is "Extreme Cache Pool" is selected.
Select the Controlling CM after changing, and click the [Change] button.
→ A confirmation screen appears.
Click the [OK] button.
→ Changing Controlling CM starts.
CautionDuring Controlling CM change, the storage system status is changed from Write Back mode to Write Through mode.
Click the [Done] button to return to the [RAID Group] screen.