


Modify Date and Time
Overview
This function specifies the date/time and time zone (storage system location) of the internal clock in the storage system.
The clock is used for checking the internal log of the storage system and in the Eco-mode, etc. The time zone setting is used for the Remote Support function.
This function is used when moving the storage system to a new installation site, and/or changing the storage system date/time.
It is possible to setup the NTP server to automatically set the time. If the NTP server cannot be used, resetting the time once a month is recommended.
When the network environment is set to the factory default, the NTP function cannot be used. Perform the [Setup Network Environment] function.
When using Eco-mode, make sure to set the date/time correctly. If the date/time of the storage system is wrong, processes for stopping and starting the disk motor cannot be performed in accordance with the Eco-mode schedule.
The [Modify Date and Time] function cannot be used while time synchronization with the NTP server is being performed.
When using the NTP server, the time modification method is the step mode (modify immediately).
When using the NTP server, the storage system is synchronized with the NTP server every three hours.
User Privileges
Availability of Executions in the Default Role
| Default role | Availability of executions |
|---|---|
| Monitor | |
| Admin | |
| StorageAdmin | |
| AccountAdmin | |
| SecurityAdmin | |
| Maintainer |
Refer to "User Roles and Policies" for details on the policies and roles.
Display Contents
In this screen, the access status for the NTP is displayed.
NTP Settings
| Item | Description |
|---|---|
Access Status |
The latest access status to the NTP server is displayed. If the time correction by NTP server has been performed, the correction status is displayed.
|
Settings
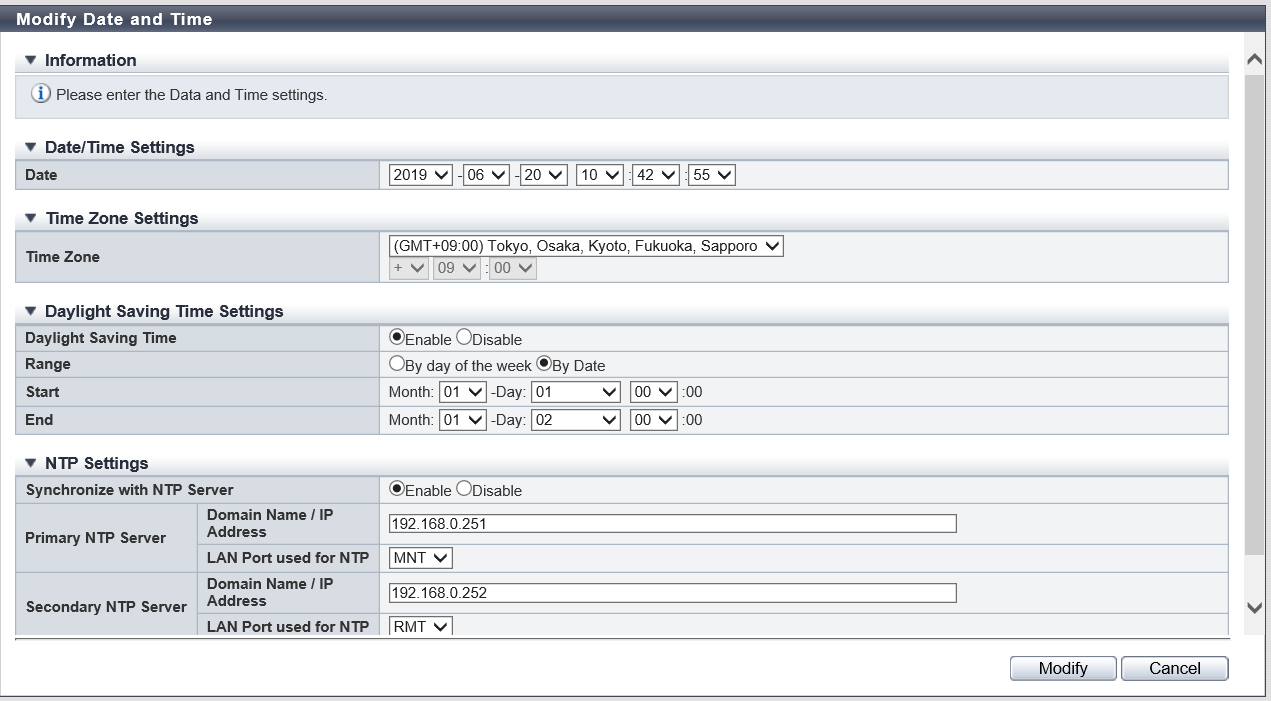
In this screen, specify the date/time and time zone (storage system location) of the internal clock in the storage system.
Date/Time Settings
| Item | Description | Setting values |
|---|---|---|
Date |
Change the current date and time settings. |
YYYY-MM-DD hh:mm:ss YYYY: Year (2001 - 2037) MM: Month (01 - 12) DD: Date (01 - 31) hh: Hour (00 - 23) mm: Minute (00 - 59) ss: Second (00 - 59) Current date and time (Default) |
Time Zone Settings
| Item | Description | Setting values |
|---|---|---|
Time Zone |
Select the Time Zone from the list box. If the appropriate Time Zone does not exist, select "Manually". |
|
Time Zone (time difference setting) |
When selecting "Manually" in the time zone field, specify the time difference from GMT using [+]/[-] in hours and minutes. |
Time difference: +/- Hour: 00 - 12 Minute: 00, 15, 30, and 45 |
Daylight Saving Time Settings
| Item | Description | Setting values |
|---|---|---|
Daylight Saving Time |
Select whether to "Enable" or "Disable" the daylight saving time. |
Enable Disable (Default) |
Range |
When daylight saving time is enabled, select either "By day of the week" or "By Date". |
By day of the week (Default) By Date |
Start (When "By day of the week" is selected for "Range") |
When daylight saving time is enabled, set the start day and the start time. |
Start day Month: 01 - 12 Week: 1st - 4th week, last (last week of month) Day: Monday - Sunday Start time Hour: 00 - 23 Month: 01 1st Sunday 00:00 (Default) |
End (When "By day of the week" is selected for "Range") |
When daylight saving time is enabled, set the end day and the end time. |
End day Month: 01 - 12 Week: 1st - 4th week, last (last week of month) Day: Monday - Sunday End time Hour: 00 - 23 Month: 01 1st Sunday 00:00 (Default) |
Start (When "By Date" is selected for "Range") |
When daylight saving time is enabled, set the start date and the start time. |
Start date Month: 01 - 12 Date: 01 - 31, Last Day (last date of the month) Start time Hour: 00 - 23 Month: 01 Date: 01 00:00 (Default) |
End (When "By Date" is selected for "Range") |
When daylight saving time is enabled, set the end date and the end time. |
End date Month: 01 - 12 Date: 01 - 31, Last Day (last date of the month) End time Hour: 00 - 23 Month: 01 Date: 01 00:00 (Default) |
NTP Settings
| Item | Description | Setting values | |
|---|---|---|---|
Synchronize with NTP Server |
When performing the time synchronization with the NTP server, select "Enable". If the time synchronization is not used, select "Disable". |
Enable Disable (Default) |
|
Primary NTP Server |
Domain Name / IP Address |
Input the domain name or the IP address of the primary NTP server. There are two methods to specify an IP address; "IPv4" and "IPv6". The following IPv6 addresses can be used; "link local address", "global address", "unique local address", or "6to4 address". Refer to "Available IPv6 Address" for details. This item is only available when "Yes" is selected for "Synchronize with NTP Server". |
Domain name or IP address For domain name specification Up to 63 alphanumeric characters and symbols For IPv4 address xxx.xxx.xxx.xxx xxx: 1 - 255 for the top field (decimal) xxx: 0 - 255 for other fields (decimal) For IPv6 address xxxx:xxxx:xxxx:xxxx:xxxx:xxxx:xxxx:xxxx xxxx: 0 - ffff (FFFF) (hexadecimal, alphanumeric characters) Refer to "IPv6 Address Notation" for details. |
LAN Port used for NTP |
Select which port is used to connect to the primary NTP server. This item is only available when "Yes" is selected for "Synchronize with NTP Server". |
MNT (Default) RMT |
|
Secondary NTP Server |
Domain Name / IP Address |
Input the domain name or the IP address of the secondary NTP server. There are two methods to specify an IP address; "IPv4" and "IPv6". The following IPv6 addresses can be used; "link local address", "global address", "unique local address", or "6to4 address". Refer to "Available IPv6 Address" for details. This item is only available when "Yes" is selected for "Synchronize with NTP Server". |
Domain name or IP address For domain name specification Up to 63 alphanumeric characters and symbols For IPv4 address xxx.xxx.xxx.xxx xxx: 1 - 255 for the top field (decimal) xxx: 0 - 255 for other fields (decimal) For IPv6 address xxxx:xxxx:xxxx:xxxx:xxxx:xxxx:xxxx:xxxx xxxx: 0 - ffff (FFFF) (hexadecimal, alphanumeric characters) Refer to "IPv6 Address Notation" for details. |
LAN Port used for NTP |
Select which port is used to connect to the secondary NTP server. This item is only available when "Yes" is selected for "Synchronize with NTP Server". |
MNT (Default) RMT |
|
Operating Procedures
Click [Modify Date and Time] in [Action].
Specify the parameters, and click the [Set] button.
→ A confirmation screen appears.
Caution- An error screen appears in the following conditions:
A non-existent date has been specified in the date/time settings
"By day of the week" is selected for the range of daylight saving time and the same day and time is entered for both the start day/time and the end day/time
"By Date" is selected for the range of daylight saving time and the same date and time is entered for both the start date/time and the end date/time
"By Date" is selected for the range of daylight saving time and a non-existent date is specified as the start date
"By Date" is selected for the range of daylight saving time and a non-existent date is specified as the end date
"Yes" is selected for "Synchronize with NTP Server" and the domain or the IP address is not entered for the primary NTP server
"Yes" is selected for "Synchronize with NTP Server" and the same domain or IP address is specified for the primary NTP server and the secondary NTP server
"Yes" is selected for "Synchronize with NTP Server", the LAN port that is used for the NTP server is "MNT", and the IPv4 address of the NTP server and the broadcast address of the MNT port are the same
"Yes" is selected for "Synchronize with NTP Server", the LAN port that is used for the NTP server is "RMT", and the IPv4 address of the NTP server and the broadcast address of the RMT port are the same
- "Yes" is selected for "Synchronize with NTP Server" and one of the following conditions applies:
The IPv4 address for the NTP server and the local host address are the same
The IP address (IPv4 address or IPv6 address) for the NTP server and the network address are the same
The IP address (IPv4 address or IPv6 address) for the NTP server and the IP address for the MNT port are the same
The IP address (IPv4 address or IPv6 address) for the NTP server and the IP address for the RMT port are the same
The IP address (IPv4 address) for the NTP server and the IP address for the FST port are the same (for the ETERNUS DX500 S5/DX600 S5/DX900 S5, the ETERNUS DX8100 S4/DX8900 S4, and the ETERNUS AF650 S3)
NoteWhen "By day of the week" is selected for the range of daylight saving time, "Last" can be selected to specify the start or end week.
When "By Date" is selected for the range of daylight saving time, "Last Day" can be selected to specify the start or end date.
- An error screen appears in the following conditions:
Click the [OK] button.
→ Setting of the date/time starts.
CautionIf "Yes" is selected for "Synchronize with NTP Server" when there is no NTP server connection or when communication with the NTP server is unstable, the required time for the date and time setting may take longer. Wait until the screen is updated. Even if connection to the NTP server fails, the date and time setting appear as though they have completed. To confirm that the storage system is successfully connected to the NTP server, start the [Modify Date and Time] function and check "Access Status" in the "NTP Settings" field.
Click the [Done] button to return to the [System Settings] screen.
Appendix
Time Zone
Select the time zone from the following;
| Time Zone |
|---|
(GMT-12:00) Eniwetok, Kwajalein |
(GMT-11:00) Samoa |
(GMT-10:00) Honolulu |
(GMT-09:00) Alaska |
(GMT-08:00) Los Angeles, San Francisco, San Diego |
(GMT-07:00) Phoenix, Calgary, Denver |
(GMT-06:00) Chicago, Mexico City |
(GMT-05:00) New York, Bogota |
(GMT-04:00) Caracas |
(GMT-03:30) Newfoundland |
(GMT-03:00) Sao Paulo, Brasilia |
(GMT-02:00) Mid-Atlantic |
(GMT-01:00) Azores Island, Cape Verde |
(GMT+00:00) Dublin, London, Manchester, Lisbon |
(GMT+01:00) Paris, Madrid, Stockholm |
(GMT+01:00) Rome, Vienna, Berlin |
(GMT+01:00) Milan, Amsterdam |
(GMT+02:00) Athens, Helsinki, Cairo |
(GMT+02:00) Beirut, Cape Town |
(GMT+03:00) Nairobi, Moscow |
(GMT+04:00) Abu Dhabi |
(GMT+05:00) Islamabad, Karachi |
(GMT+05:30) New Delhi |
(GMT+06:00) Dhaka |
(GMT+07:00) Bangkok, Jakarta |
(GMT+08:00) Hong Kong, Manila, Singapore |
(GMT+08:00) Beijing, Taipei, Kuala Lumpur, Perth |
(GMT+09:00) Tokyo, Osaka, Kyoto, Fukuoka, Sapporo |
(GMT+09:00) Seoul |
(GMT+09:30) Adelaide |
(GMT+10:00) Guam, Sydney, Melbourne |
(GMT+11:00) Solomon Islands, New Caledonia |
(GMT+12:00) Wellington, Auckland, Fiji |
Manually |