SnapCenter Plug-in for VMware vSphere 6 Manuals ( CA08871-405 )
Upgrade from an earlier release of SnapCenter Plug-in for VMware vSphere
| Upgrade to SCV 6.1 is supported only on VMware vCenter server 7 update 1 and later versions, for VMware vCenter server prior to version 7 update 1, you should continue to use SCV 4.7. The upgrade is disruptive on unsupported versions of VMware vCenter server. |
If you are using the SnapCenter Plug-in for VMware vSphere virtual appliance, you can upgrade to a newer release.
The upgrade process unregisters the existing plug-in and deploys a plug-in that is compatible only with vSphere 7.0U1 and later versions.
Upgrade paths
If you are on SnapCenter Plug-in for VMware vSphere (SCV) version… |
You can directly upgrade SnapCenter Plug-in for VMware vSphere to… |
SCV 6.0 |
Upgrade to SCV 6.1 |
SCV 5.0 |
Upgrade to SCV 6.0 and SCV 6.1 |
SCV 4.9 |
Upgrade to SCV 5.0 and SCV 6.0 |
SCV 4.8 |
Upgrade to SCV 4.9 and SCV 5.0 |
SCV 4.7 |
Upgrade to SCV 4.8 and SCV 4.9 |
SCV 4.6 |
Upgrade to SCV 4.7 and SCV 4.8 |
| Backup the SnapCenter Plug-in for VMware vSphere OVA before starting an upgrade. |
| Switching your network configuration from static to DHCP is not supported. |
For the latest information about supported versions, please contact our support.
-
Prepare for the upgrade by disabling SnapCenter Plug-in for VMware vSphere.
-
Log in to the SnapCenter Plug-in for VMware vSphere management GUI.
The IP address is displayed when you deploy the SnapCenter Plug-in for VMware vSphere. -
Click Configuration in the left navigation pane, and then click the Service option in the Plug-in Details section to disable the plug-in.
-
-
Download the upgrade
.isofile.-
Log in to the our Support Site (http://www.fujitsu.com/global/support/).
-
From the list of products, select SnapCenter Plug-in for VMware vSphere, then click the DOWNLOAD LATEST RELEASE button.
-
Download the SnapCenter Plug-in for VMware vSphere upgrade
.isofile to any location.
-
-
Install the upgrade.
-
In your browser, navigate to the VMware vSphere vCenter.
-
On the vCenter GUI, click vSphere client (HTML).
-
Log in to the VMware vCenter Single Sign-On page.
-
On the navigator pane, click the VM that you want to upgrade and then click the Summary tab.
-
On the Related Objects pane, click on any datastore in the list and then click the Summary tab.
-
On the Files tab for the selected datastore, click on any folder in the list, and then click Upload files.
-
On the upload pop-up screen, navigate to the location where you downloaded the
.isofile, then click on the.isofile image, and then click Open.
The file is uploaded to the datastore. -
Navigate back to VM that you want to upgrade, and click the Summary tab.
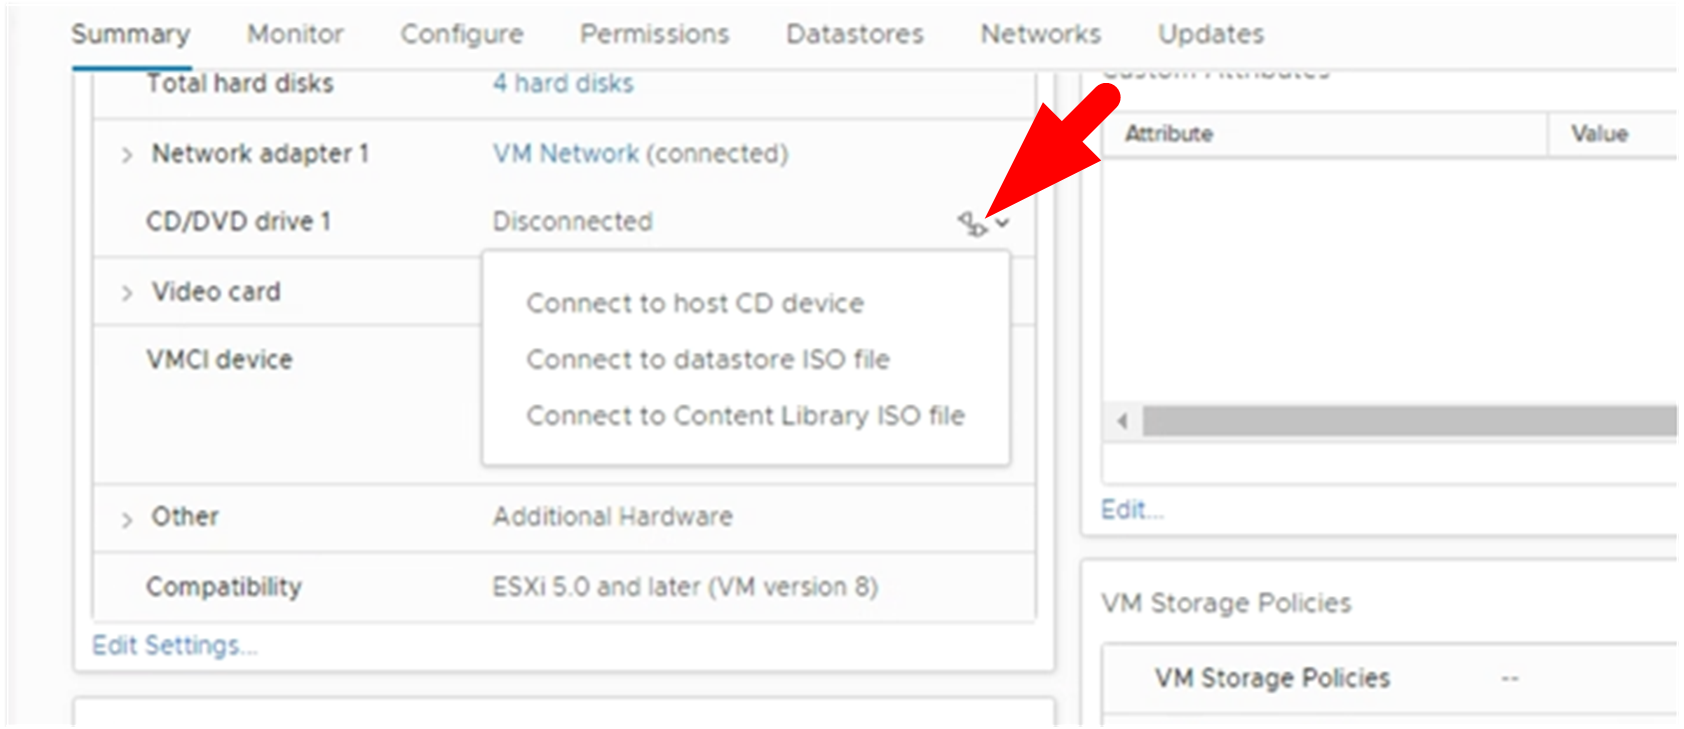
In the VM Hardware pane, in the CD/DVD field, the value should be “Disconnected”. -
Click the connection icon in the CD/DVD field and select Connect to CD/DVD image on a datastore.

-
In the wizard, do the following:
-
In the Datastores column, select the datastore where you uploaded the
.isofile. -
In the Contents column, navigate to the
.isofile you uploaded, make sure “ISO image” is selected in the File Type field, and then click OK.
Wait until the field shows the “Connected” status.
-
-
Log onto the Maintenance console by accessing the Summary tab of the virtual appliance and then click the green run arrow to start the maintenance console.
-
Enter 2 for System Configuration, then enter 8 for Upgrade.
-
Enter y to continue and start the upgrade.
-
