
ONTAP 9 Manuals ( CA08871-402 )
Manual nondisruptive ONTAP upgrade of a four- or eight-node MetroCluster configuration using the CLI
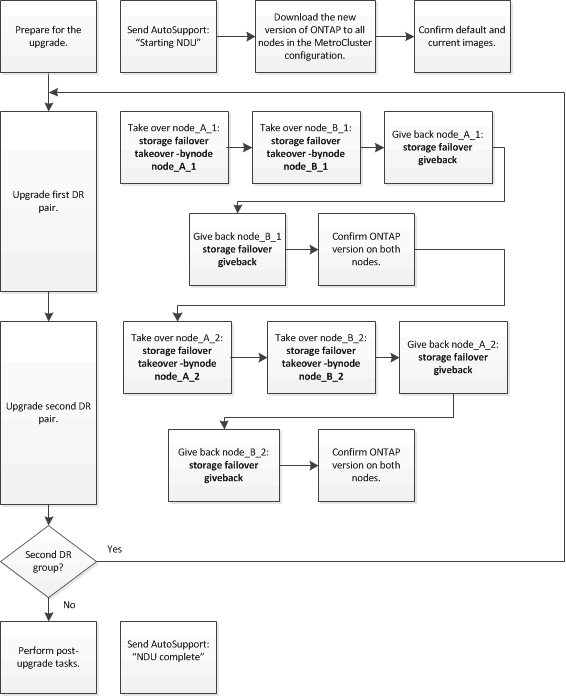
A manual upgrade of a four- or eight-node MetroCluster configuration involves preparing for the update, updating the DR pairs in each of the one or two DR groups simultaneously, and performing post-upgrade tasks.
-
If you have a two-node MetroCluster configuration, do not use this procedure.
-
The following tasks refer to the old and new versions of ONTAP.
-
When upgrading, the old version is a previous version of ONTAP, with a lower version number than the new version of ONTAP.
-
When downgrading, the old version is a later version of ONTAP, with a higher version number than the new version of ONTAP.
-
-
This task uses the following high-level workflow:
Differences when updating ONTAP software on an eight-node or four-node MetroCluster configuration
The MetroCluster software upgrade process differs, depending on whether there are eight or four nodes in the MetroCluster configuration.
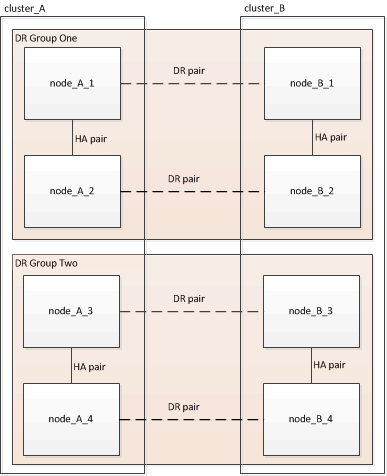
A MetroCluster configuration consists of one or two DR groups. Each DR group consists of two HA pairs, one HA pair at each MetroCluster cluster. An eight-node MetroCluster includes two DR groups:
You upgrade one DR group at a time.
-
Upgrade DR Group One:
-
Upgrade node_A_1 and node_B_1.
-
Upgrade node_A_2 and node_B_2.
-
-
Upgrade DR Group One:
-
Upgrade node_A_1 and node_B_1.
-
Upgrade node_A_2 and node_B_2.
-
-
Upgrade DR Group Two:
-
Upgrade node_A_3 and node_B_3.
-
Upgrade node_A_4 and node_B_4.
-
Preparing to upgrade a MetroCluster DR group
Before you upgrade the ONTAP software on the nodes, you must identify the DR relationships among the nodes, send an AutoSupport message that you are initiating an upgrade, and confirm the ONTAP version running on each node.
You must have downloaded and installed the software images.
This task must be repeated on each DR group. If the MetroCluster configuration consists of eight nodes, there are two DR groups. Thereby, this task must be repeated on each DR group.
The examples provided in this task use the names shown in the following illustration to identify the clusters and nodes:
-
Identify the DR pairs in the configuration:
metrocluster node show -fields dr-partnercluster_A::> metrocluster node show -fields dr-partner (metrocluster node show) dr-group-id cluster node dr-partner ----------- ------- -------- ---------- 1 cluster_A node_A_1 node_B_1 1 cluster_A node_A_2 node_B_2 1 cluster_B node_B_1 node_A_1 1 cluster_B node_B_2 node_A_2 4 entries were displayed. cluster_A::>
-
Set the privilege level from admin to advanced, entering y when prompted to continue:
set -privilege advancedThe advanced prompt (
*>) appears. -
Confirm the ONTAP version on cluster_A:
system image showcluster_A::*> system image show Is Is Install Node Image Default Current Version Date -------- ------- ------- ------- ------- ------------------- node_A_1 image1 true true X.X.X MM/DD/YYYY TIME image2 false false Y.Y.Y MM/DD/YYYY TIME node_A_2 image1 true true X.X.X MM/DD/YYYY TIME image2 false false Y.Y.Y MM/DD/YYYY TIME 4 entries were displayed. cluster_A::> -
Confirm the version on cluster_B:
system image showcluster_B::*> system image show Is Is Install Node Image Default Current Version Date -------- ------- ------- ------- ------- ------------------- node_B_1 image1 true true X.X.X MM/DD/YYYY TIME image2 false false Y.Y.Y MM/DD/YYYY TIME node_B_2 image1 true true X.X.X MM/DD/YYYY TIME image2 false false Y.Y.Y MM/DD/YYYY TIME 4 entries were displayed. cluster_B::> -
Trigger an AutoSupport notification:
autosupport invoke -node * -type all -message "Starting_NDU"This AutoSupport notification includes a record of the system status before the upgrade. It saves useful troubleshooting information if there is a problem with the upgrade process.
If your cluster is not configured to send AutoSupport messages, then a copy of the notification is saved locally.
-
For each node in the first set, set the target ONTAP software image to be the default image:
system image modify {-node nodename -iscurrent false} -isdefault trueThis command uses an extended query to change the target software image, which is installed as the alternate image, to be the default image for the node.
-
Verify that the target ONTAP software image is set as the default image on cluster_A:
system image showIn the following example, image2 is the new ONTAP version and is set as the default image on each of the nodes in the first set:
cluster_A::*> system image show Is Is Install Node Image Default Current Version Date -------- ------- ------- ------- ------- ------------------- node_A_1 image1 false true X.X.X MM/DD/YYYY TIME image2 true false Y.Y.Y MM/DD/YYYY TIME node_A_2 image1 false true X.X.X MM/DD/YYYY TIME image2 true false Y.Y.Y MM/DD/YYYY TIME 2 entries were displayed.-
Verify that the target ONTAP software image is set as the default image on cluster_B:
system image showThe following example shows that the target version is set as the default image on each of the nodes in the first set:
 cluster_B::*> system image show
                  Is      Is              Install
 Node     Image   Default Current Version Date
 -------- ------- ------- ------- ------- -------------------
 node_A_1
          image1  false   true    X.X.X   MM/DD/YYYY TIME
          image2  true    false   Y.Y.Y   MM/YY/YYYY TIME
 node_A_2
          image1  false   true    X.X.X   MM/DD/YYYY TIME
          image2  true    false   Y.Y.Y   MM/DD/YYYY TIME

 2 entries were displayed.
-
-
Determine whether the nodes to be upgraded are currently serving any clients twice for each node:
system node run -node target-node -command uptimeThe uptime command displays the total number of operations that the node has performed for NFS, CIFS, FC, and iSCSI clients since the node was last booted. For each protocol, you need to run the command twice to determine whether the operation counts are increasing. If they are increasing, the node is currently serving clients for that protocol. If they are not increasing, the node is not currently serving clients for that protocol.
You should make a note of each protocol that has increasing client operations so that after the node is upgraded, you can verify that client traffic has resumed. This example shows a node with NFS, CIFS, FC, and iSCSI operations. However, the node is currently serving only NFS and iSCSI clients.
 cluster_x::> system node run -node node0 -command uptime
   2:58pm up  7 days, 19:16 800000260 NFS ops, 1017333 CIFS ops, 0 HTTP ops, 40395 FCP ops, 32810 iSCSI ops

 cluster_x::> system node run -node node0 -command uptime
   2:58pm up  7 days, 19:17 800001573 NFS ops, 1017333 CIFS ops, 0 HTTP ops, 40395 FCP ops, 32815 iSCSI ops
Updating the first DR pair in a MetroCluster DR group
You must perform a takeover and giveback of the nodes in the correct order to make the new version of ONTAP the current version of the node.
All nodes must be running the old version of ONTAP.
In this task, node_A_1 and node_B_1 are upgraded.
If you have upgraded the ONTAP software on the first DR group, and are now upgrading the second DR group in an eight-node MetroCluster configuration, in this task you would be updating node_A_3 and node_B_3.
-
If MetroCluster Tiebreaker software is enabled, disabled it.
-
For each node in the HA pair, disable automatic giveback:
storage failover modify -node target-node -auto-giveback falseThis command must be repeated for each node in the HA pair.
-
Verify that automatic giveback is disabled:
storage failover show -fields auto-givebackThis example shows that automatic giveback has been disabled on both nodes:
 cluster_x::> storage failover show -fields auto-giveback
 node     auto-giveback
 -------- -------------
 node_x_1 false
 node_x_2 false
 2 entries were displayed.
-
Ensure that I/O is not exceeding ~50% for each controller and that CPU utilization is not exceeding ~50% per controller.
-
Initiate a takeover of the target node on cluster_A:
Do not specify the -option immediate parameter, because a normal takeover is required for the nodes that are being taken over to boot onto the new software image.
-
Take over the DR partner on cluster_A (node_A_1):
storage failover takeover -ofnode node_A_1The node boots up to the "Waiting for giveback" state.
If AutoSupport is enabled, then an AutoSupport message is sent indicating that the nodes are out of cluster quorum. You can ignore this notification and proceed with the upgrade. -
Verify that the takeover is successful:
storage failover showThe following example shows that the takeover is successful. Node_A_1 is in the "Waiting for giveback" state and node_A_2 is in the "In takeover" state.
 cluster1::> storage failover show
                               Takeover
 Node           Partner        Possible State Description
 -------------- -------------- -------- -------------------------------------
 node_A_1       node_A_2       -        Waiting for giveback (HA mailboxes)
 node_A_2       node_A_1       false    In takeover
 2 entries were displayed.
-
-
Take over the DR partner on cluster_B (node_B_1):
Do not specify the -option immediate parameter, because a normal takeover is required for the nodes that are being taken over to boot onto the new software image.
-
Take over node_B_1:
storage failover takeover -ofnode node_B_1The node boots up to the "Waiting for giveback" state.
If AutoSupport is enabled, then an AutoSupport message is sent indicating that the nodes are out of cluster quorum. You can ignore this notification and proceed with the upgrade. -
Verify that the takeover is successful:
storage failover showThe following example shows that the takeover is successful. Node_B_1 is in the "Waiting for giveback" state and node_B_2 is in the "In takeover" state.
 cluster1::> storage failover show
                               Takeover
 Node           Partner        Possible State Description
 -------------- -------------- -------- -------------------------------------
 node_B_1       node_B_2       -        Waiting for giveback (HA mailboxes)
 node_B_2       node_B_1       false    In takeover
 2 entries were displayed.
-
-
Wait at least eight minutes to ensure the following conditions:
-
Client multipathing (if deployed) is stabilized.
-
Clients are recovered from the pause in I/O that occurs during takeover.
The recovery time is client-specific and might take longer than eight minutes depending on the characteristics of the client applications.
-
-
Return the aggregates to the target nodes:
After upgrading MetroCluster IP configurations to ONTAP 9.7 or later, the aggregates will be in a degraded state for a short period before resynchronizing and returning to a mirrored state.
-
Give back the aggregates to the DR partner on cluster_A:
storage failover giveback -ofnode node_A_1 -
Give back the aggregates to the DR partner on cluster_B:
storage failover giveback -ofnode node_B_1The giveback operation first returns the root aggregate to the node and then, after the node has finished booting, returns the non-root aggregates.
-
-
Verify that all aggregates have been returned by issuing the following command on both clusters:
storage failover show-givebackIf the Giveback Status field indicates that there are no aggregates to give back, then all aggregates have been returned. If the giveback is vetoed, the command displays the giveback progress and which subsystem vetoed the giveback.
-
If any aggregates have not been returned, do the following:
-
Review the veto workaround to determine whether you want to address the “veto” condition or override the veto.
-
If necessary, address the “veto” condition described in the error message, ensuring that any identified operations are terminated gracefully.
-
Reenter the storage failover giveback command.
If you decided to override the “veto” condition, set the -override-vetoes parameter to true.
-
-
Wait at least eight minutes to ensure the following conditions:
-
Client multipathing (if deployed) is stabilized.
-
Clients are recovered from the pause in I/O that occurs during giveback.
The recovery time is client-specific and might take longer than eight minutes depending on the characteristics of the client applications.
-
-
Set the privilege level from admin to advanced, entering y when prompted to continue:
set -privilege advancedThe advanced prompt (
*>) appears. -
Confirm the version on cluster_A:
system image showThe following example shows that System image2 should is the default and current version on node_A_1:
cluster_A::*> system image show Is Is Install Node Image Default Current Version Date -------- ------- ------- ------- -------- ------------------- node_A_1 image1 false false X.X.X MM/DD/YYYY TIME image2 true true Y.Y.Y MM/DD/YYYY TIME node_A_2 image1 false true X.X.X MM/DD/YYYY TIME image2 true false Y.Y.Y MM/DD/YYYY TIME 4 entries were displayed. cluster_A::> -
Confirm the version on cluster_B:
system image showThe following example shows that System image2 is the default and current version on node_A_1:
 cluster_A::*> system image show
                  Is      Is               Install
 Node     Image   Default Current Version  Date
 -------- ------- ------- ------- -------- -------------------
 node_B_1
          image1  false   false    X.X.X   MM/DD/YYYY TIME
          image2  true    true     Y.Y.Y   MM/DD/YYYY TIME
 node_B_2
          image1  false   true     X.X.X   MM/DD/YYYY TIME
          image2  true    false    Y.Y.Y   MM/DD/YYYY TIME
 4 entries were displayed.

 cluster_A::>
Updating the second DR pair in a MetroCluster DR group
You must perform a takeover and giveback of the node in the correct order to make the new version of ONTAP the current version of the node.
You should have upgraded the first DR pair (node_A_1 and node_B_1).
In this task, node_A_2 and node_B_2 are upgraded.
If you have upgraded the ONTAP software on the first DR group, and are now updating the second DR group in an eight-node MetroCluster configuration, in this task you are updating node_A_4 and node_B_4.
-
Migrate all of the data LIFs away from the node:
network interface migrate-all -node nodenameA -
Initiate a takeover of the target node on cluster_A:
Do not specify the -option immediate parameter, because a normal takeover is required for the nodes that are being taken over to boot onto the new software image.
-
Take over the DR partner on cluster_A:
storage failover takeover -ofnode node_A_2 -option allow-version-mismatchThe node boots up to the "Waiting for giveback" state.
If AutoSupport is enabled, then an AutoSupport message is sent indicating that the nodes are out of cluster quorum. You can ignore this notification and proceed with the upgrade.
-
Verify that the takeover is successful:
storage failover showThe following example shows that the takeover is successful. Node_A_2 is in the "Waiting for giveback" state and node_A_1 is in the "In takeover" state.
cluster1::> storage failover show
                              Takeover
Node           Partner        Possible State Description
-------------- -------------- -------- -------------------------------------
node_A_1       node_A_2       false    In takeover
node_A_2       node_A_1       -        Waiting for giveback (HA mailboxes)
2 entries were displayed.
-
-
Initiate a takeover of the target node on cluster_B:
Do not specify the -option immediate parameter, because a normal takeover is required for the nodes that are being taken over to boot onto the new software image.
The node boots up to the "Waiting for giveback" state.
If AutoSupport is enabled, an AutoSupport message is sent indicating that the nodes are out of cluster quorum. You can safely ignore this notification and proceed with the upgrade. -
Verify that the takeover is successful:
storage failover showThe following example shows that the takeover is successful. Node_B_2 is in the "Waiting for giveback" state and node_B_1 is in the "In takeover" state.
cluster1::> storage failover show
                              Takeover
Node           Partner        Possible State Description
-------------- -------------- -------- -------------------------------------
node_B_1       node_B_2       false    In takeover
node_B_2       node_B_1       -        Waiting for giveback (HA mailboxes)
2 entries were displayed.
-
-
Wait at least eight minutes to ensure the following conditions:
-
Client multipathing (if deployed) is stabilized.
-
Clients are recovered from the pause in I/O that occurs during takeover.
The recovery time is client-specific and might take longer than eight minutes depending on the characteristics of the client applications.
-
Give back the aggregates to the DR partner on cluster_A:
storage failover giveback -ofnode node_A_2 -
Give back the aggregates to the DR partner on cluster_B:
storage failover giveback -ofnode node_B_2The giveback operation first returns the root aggregate to the node and then, after the node has finished booting, returns the non-root aggregates.
-
-
-
Verify that all aggregates have been returned by issuing the following command on both clusters:
storage failover show-givebackIf the Giveback Status field indicates that there are no aggregates to give back, then all aggregates have been returned. If the giveback is vetoed, the command displays the giveback progress and which subsystem vetoed the giveback.
-
If any aggregates have not been returned, do the following:
-
Review the veto workaround to determine whether you want to address the “veto” condition or override the veto.
-
If necessary, address the “veto” condition described in the error message, ensuring that any identified operations are terminated gracefully.
-
Reenter the storage failover giveback command.
If you decided to override the “veto” condition, set the -override-vetoes parameter to true.
-
-
Wait at least eight minutes to ensure the following conditions:
-
Client multipathing (if deployed) is stabilized.
-
Clients are recovered from the pause in I/O that occurs during giveback.
The recovery time is client-specific and might take longer than eight minutes depending on the characteristics of the client applications.
-
-
Set the privilege level from admin to advanced, entering y when prompted to continue:
set -privilege advancedThe advanced prompt (
*>) appears. -
Confirm the version on cluster_A:
system image showThe following example shows that System image2 (target ONTAP image) is the default and current version on node_A_2:
cluster_B::*> system image show Is Is Install Node Image Default Current Version Date -------- ------- ------- ------- ---------- ------------------- node_A_1 image1 false false X.X.X MM/DD/YYYY TIME image2 true true Y.Y.Y MM/DD/YYYY TIME node_A_2 image1 false false X.X.X MM/DD/YYYY TIME image2 true true Y.Y.Y MM/DD/YYYY TIME 4 entries were displayed. cluster_A::> -
Confirm the version on cluster_B:
system image showThe following example shows that System image2 (target ONTAP image) is the default and current version on node_B_2:
cluster_B::*> system image show Is Is Install Node Image Default Current Version Date -------- ------- ------- ------- ---------- ------------------- node_B_1 image1 false false X.X.X MM/DD/YYYY TIME image2 true true Y.Y.Y MM/DD/YYYY TIME node_B_2 image1 false false X.X.X MM/DD/YYYY TIME image2 true true Y.Y.Y MM/DD/YYYY TIME 4 entries were displayed. cluster_A::> -
For each node in the HA pair, enable automatic giveback:
storage failover modify -node target-node -auto-giveback trueThis command must be repeated for each node in the HA pair.
-
Verify that automatic giveback is enabled:
storage failover show -fields auto-givebackThis example shows that automatic giveback has been enabled on both nodes:
cluster_x::> storage failover show -fields auto-giveback
node     auto-giveback
-------- -------------
node_x_1 true
node_x_2 true
2 entries were displayed.